Virtual props work by detecting faces and overlaying them with an image such as glasses, hats, bunny ears, beards etc. The face detection can detect whether someone is smiling and display a different virtual prop when they are "happy" or "sad".
Virtual props work in both photo mode and burst GIF mode.
The app has a "High quality face detect" option which can be selected in the App Settings. This gives more stable placement of virtual props but is only suitable for more powerful iPads such as iPad Pro models and iPads with an A12 processor or better (e.g. iPad Air 10.5" or iPad Mini 5). On less powerful iPads the high quality face detect setting may cause the live view refresh rate to be reduced.
Up to 10 different virtual props can be defined and selected using touchscreen actions in the ready or menu screens. A virtual prop is defined by a PNG overlay for "normal" faces and an optional PNG overlay for "smiling" faces. The filename defines the prop number, whether it is for "normal" or "smiling" faces and its placement relative to the person's eyes. The alpha channel of the PNG image is used to specify the opacity of the overlay allowing areas to range from being fully transparent to opaque.
Example:
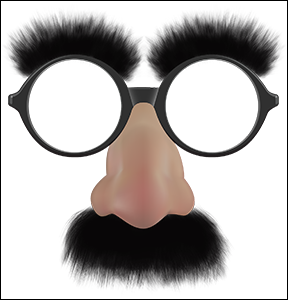
prop2Normal_{w48%h66%}.png
The filename starts with prop2Normal_ which indicates it is the overlay for virtual prop number two to be added to "normal" faces. An optional virtual prop for "smiling" faces would start with prop2Smiling_
The rest of the filename, {w48%h66%}, provides information about where the centers of the prop's eyes are defined within the overlay image. The prop image is resized and rotated so that the centers of the eyes in the prop are placed over the centers of the person's eyes in the photo.
The w48% value indicates that the width between the centers of the eyes is not quite half the width of the overlay image. The h66% value indicates that the centers of the eyes are about 2/3 of the height of the overlay measured from the bottom:
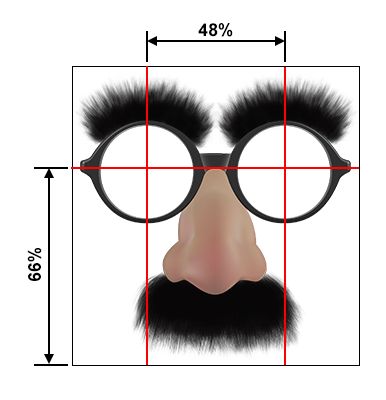
The overlay can be moved up relative to the person's eyes by reducing the h value e.g. h0% would place the bottom of the overlay at the person's eye level.
The overlay can be made larger relative to the person's face by reducing the w setting or smaller by increasing the w setting.
The size and position of the virtual props can also be edited interactively using the virtual prop editor to automatically update the filenames.
Multiple Props
Different virtual props can be added to each guest in a photo by defining multiple props. The filenames should have the guest number appended to the filenames. The props will be applied to the guests from left to right e.g.
prop1Normal1_{w48%h66%}.png - virtual prop applied to the first guest in the photo when prop #1 is selected
prop1Normal2_{w48%h66%}.png - virtual prop applied to the second guest in the photo when prop #1 is selected
prop1Normal3_{w48%h66%}.png - virtual prop applied to the third guest in the photo when prop #1 is selected
prop2Normal1_{w48%h66%}.png - virtual prop applied to the first guest in the photo when prop #2 is selected
If only one virtual prop is defined it will be applied to all the faces detected in the photos. If multiple virtual props are defined the first prop will be added to the first face detected in the photo, the second prop to the second face etc. If more faces are detected than there are props defined it wraps around again e.g. if three faces are detected and only two props are defined the first face will have prop 1, the second face will have prop 2 and the third face will have prop 1.
Virtual Props Containing Text
The live view on photo booths is normally mirrored because this is how people are used to seeing themselves but this can cause problems with virtual props that contain text because the text will be mirrored in the live view display. Breeze Booth solves this problem by allowing a reversed copy of the virtual prop to be used for live view. The reversed copy of the virtual prop should be identical to the normal prop except for the text which should be reversed. The filename of the reversed copy of the virtual prop should have the same filename as the normal copy but with "Reversed" added before "Normal" or "Smiling" e.g prop1ReversedNormal_{w38%h46%}.png.
The props and filters sample event has an example of a virtual prop containing text for the 3-D glasses prop:

prop1Normal_{w38%h46%}.png
It also includes a reversed copy of the prop so that the word "3-D" appears the correct way round when displayed in the mirrored live view display:

prop1ReversedNormal_{w38%h46%}.png
Creating Your Own Virtual Props
You can create your own virtual props by simply creating a suitable PNG image file and saving it in the screen folder with a filename indicating the number of the virtual prop with initial settings for its size and position e.g. prop4Normal_{w50%h50%}.png to define virtual prop #4. Then use the virtual prop editor to adjust its size and position.
Example: create a new virtual prop based on the one shown above and darken the glasses.
First copy the PNG image file for prop #2, prop2Normal_{w48%h66%}.png, and name it prop4Normal_{w48%h66%}.png for prop #4.
Then edit it in an image editor such as Photoshop to add a semi-transparent blue layer in the glasses:

Next use the virtual prop editor to adjust its size and position:
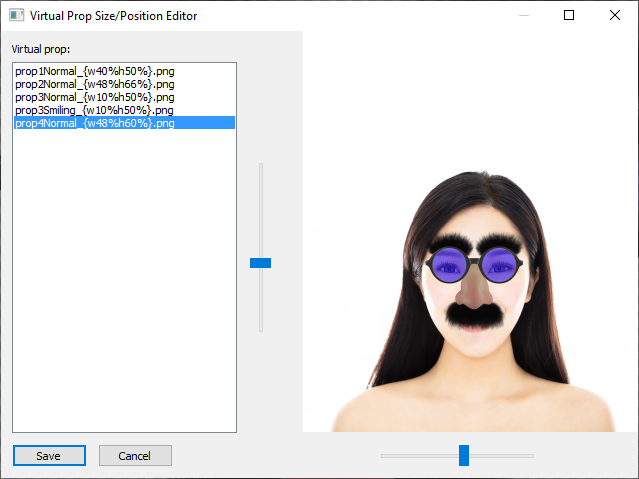
If a virtual prop has a reversed copy the virtual prop editor will automatically update the size and position of both the normal and reversed copy when the sliders are adjusted.
Finally use the Touchscreen Editor to add the touchscreen action "virtualProp4" in the ready screen to select the new prop.
There is also an example of creating a new virtual prop for a hat on the Virtual Prop Editor page.
Selecting Virtual Props
Virtual props can be displayed initially by selecting the virtual props option in the General Settings page in the event editor. You can give the user the option to select a different virtual prop or to disable virtual props by adding touchscreen actions to the ready or menu screens using the Touchscreen Editor.
Touchscreen actions affecting virtual props in the stills ready screen:
virtualPropOff - disable virtual props
virtualProp1 - select virtual prop #1
virtualProp2 - select virtual prop #2
virtualProp3 - select virtual prop #3
virtualProp4 - select virtual prop #4
virtualProp5 - select virtual prop #5
virtualProp6 - select virtual prop #6
virtualProp7 - select virtual prop #7
virtualProp8 - select virtual prop #8
virtualProp9 - select virtual prop #9
virtualProp10 - select virtual prop #10
If virtual props are not selected in the General Settings page they won't be displayed initially but can still be selected using touchscreen actions.