The "General" settings tab of the event editor contains general settings that specify how the event starts up and behaves, the use of virtual props and the touchscreen actions used to control it:

The "Startup mode" setting specifies whether to start in photo mode (individual photos which can be printed or shared with an optional slideshow GIF or MP4 movie), burst GIF mode (records a short silent movie which can be played in a loop with optional "boomerang" forward/backward play back) or video mode (records a short video with or without sound which can be processed to add effects such as jump cuts, forwards/reverse playback and speed ramping).
Use the "Style" setting to specify one of the following styles for the photos and GIFs:
| • | normal - normal color images |
| • | monochrome - black and white images |
| • | sepia - monochrome images with a sepia tint |
| • | comic - half-tone image with a limited set of exaggerated colors reminiscent of comic books |
| • | filter1 to filter6 - user definable filters which apply a look up table to create effects such as low or high contrast images or false color effects. Please see Filters for more information. |
Use the "Mirror effect" to specify mirroring effects (only available in photo and burst GIF modes):

Mirror off
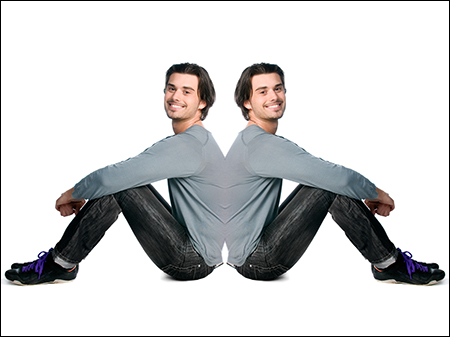
Mirror left/right

Mirror top/bottom

Mirror swap top halves
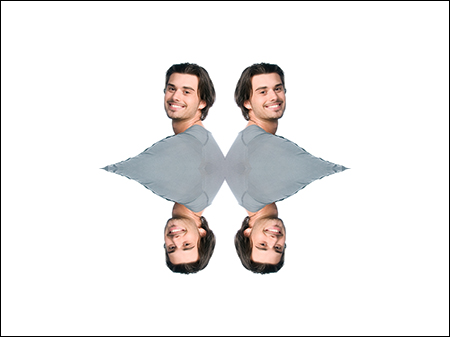
Mirror 2x2 mosaic
The photo aspect ratio option allows the photos to be normal (4:3 aspect ratio), square, DSLR 3 to 2 aspect ratio or video 16 to 9 aspect ratio. This setting affects the cropping of images in the live view display as well as photos added to prints, slideshow GIFs, burst GIFs and video capture.
The screen aspect ratio setting can be set to 4:3 (most iPads), iPad Air 10.9", iPad Pro 11", "16:9 (most iPhones)" or "19.5:9 (iPhone X series)".
All iPads apart from the iPad Air 10.9" and iPad Pro 11" have a screen aspect ratio of 4:3 whereas the iPad Air 10.9 and iPad Pro 11" each have a screen aspect ratio which is slightly taller and narrower.
iPhone screens have a higher aspect ratio (i.e. their screens are taller and narrower in portrait orientation) than iPads with most iPhons having a screen aspect ratio of 16:9 and the X series iPhones an aspect ratio of 19.5:9.
If you are running an event designed for a different aspect ratio than the device it is running on it will display black borders on the unused areas of the screen
e.g. If the screen aspect ratio is set to "4:3 (most iPads)" it will fill the screen on all iPads except the iPad Pro which will display a small black border at the top and bottom of the screen in portrait orientation or the sides in landscape orientation.On most iPhones there will be a larger black border top and bottom in portrait orientation or at the sides in landscape orientation. On an iPhone X series the borders will be even larger when displaying screens designed for 4:3 aspect ratio iPads.
Select "Apply skin smoothing filter" and set the filter strength to apply skin smoothing to photos. The skin smoothing filter uses advanced image processing techniques to smooth skin tones and remove blemishes without losing detail in the rest of the photo.
The strength of the skin smoothing filter can be adjusted from 0 (no smoothing applied) to 1.0 (maximum smoothing applied). The default setting is 0.4. There are some examples shown below using different settings but we recommend you try different setting to find what works best for your setup.
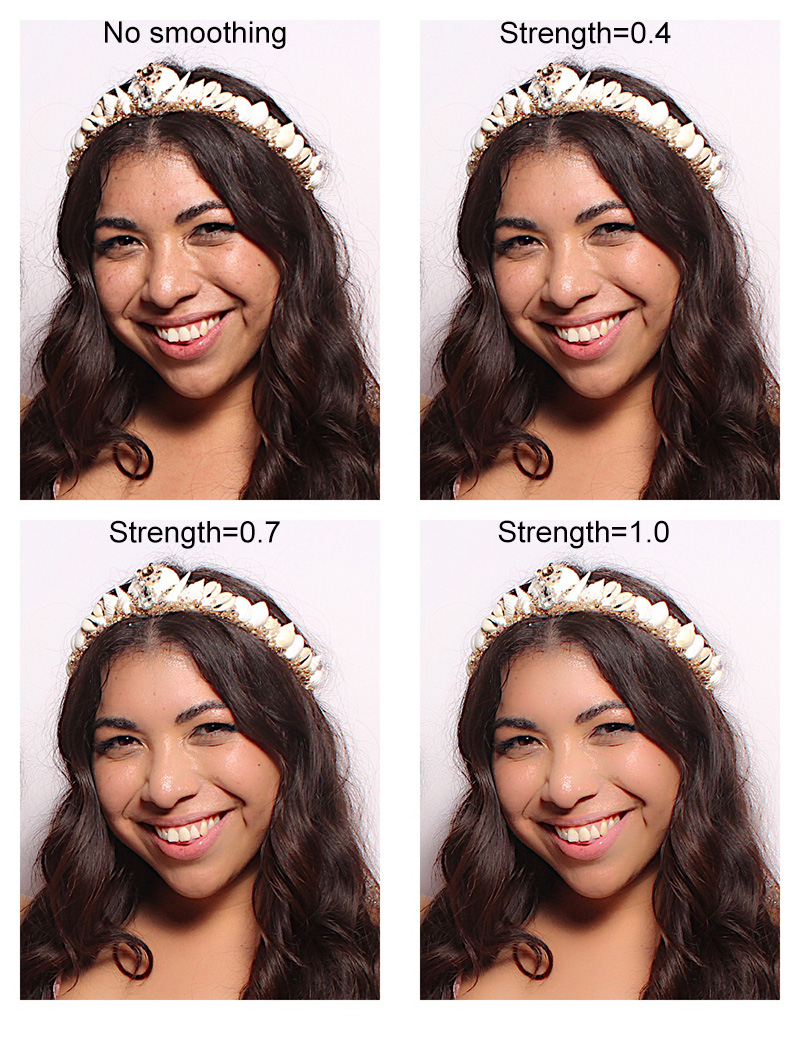
Please note that the skin smoothing filter is applied to both photos and burst GIFs but is not applied in real time to the live view images. Skin smoothing is only available in photo and burst GIF modes and is not available in video mode.
Use the "Download filename" setting to specify the filenames used for photos, GIFs and MP4s saved by the app. This setting can use tokens to include information that is evaluated at run time e.g. the time and date.
Use the "Download folder" setting to specify the folder in which to save photos, GIFs and MP4s saved by the app. This setting can also use tokens to include information that is evaluated at run time e.g. the time and date. The {dateLess8h} tokens is useful for events which may run after midnight because it ensures all the photos are saved in the same folder by returning the date less 8 hours.
The screen folder setting is normally set to the period/fullstop character to tell the app to look for screen and other images in the same folder as the profile settings.xml file. Advanced users creating complex set ups involving multiple profiles can use this setting to switch to a different folder for the screen images.
The "Overlay fade time" specifies the time in seconds when fading from one overlay screen image to another and can be used to provide more fluid screen transitions. This works best if each screen uses an overlay for the icons or button images e.g. use the ready_overlay.png image for the start button and the background.jpg image for the screen background. An overlay fade time of between 0.5 seconds and 1 second is a good starting point.
Set the "Overlay fade time" to 0 to disable fading between overlays.
Set the "Inactivity timeout" to the timeout in seconds before the inactivity action is applied. The inactivity timeout action can switch to the standby screen or load a profile.
The inactivity timeout can be disabled by setting it to 0.
The "Menu timeout (secs)" setting defines how long a menu screen is displayed before timing out and being closed automatically.
The power saving mode setting saves power by reducing the live view refresh rate when the ready screen is displayed. When the countdown starts the live view refresh rate reverts to full speed to give a smoother live view display.
The standby screen dimming setting saves power by dimming the screen when in standby mode. Set the amount to dim the screen from 1 (full brightness) to 0 (completely dark). When the user taps the screen the ready screen will be displayed using the normal brightness setting.
Note: Live view is also disabled when in standby mode to further reduce power usage.
Click on the "Power saving..." button for additional settings to save power. Please see Power Saving Settings for details.
Select the "Virtual props" option to enable virtual props at startup. Virtual props can also be selected using touchscreen actions in the ready screens even if the "Virtual props" setting is not selected in the "General" settings.
Normally virtual props are added after applying styles such as monochrome, sepia or comic, but they can be applied before the styles by selecting the "Add virtual props before applying styles option".
Click on the "Edit props..." button to display the virtual prop editor to size and position the props relative to people's faces. Please see Virtual Prop Editor for more information.
The scanning of QR codes containing strings or commands can be enabled using the QR code string scanning and QR code command scanning checkboxes.
Select the "Show live view in sharing screens" checkbox to display live view in the sharing screens to allow users to scan QR codes for automatically sending emails.
Please see the section on QR Codes for more information.
The "Remove background" setting is used to select the AI background removal options (aka "green screen without the green screen"). Breeze Booth for iPad v3.1 and later offers built-in background removal for live view images, photos, burst GIFs and videos. It also offers web based AI background removal for higher quality results when taking photos (this requires a separate subscription with the service providing the AI background removal). Please see the section on AI background removal for details.
A fast iPad (e.g. a 2022 iPad Pro with M2 processor or a 2021 iPad Pro or 2022 iPad Air with M1 processor or a 2022 iPad 10.9" 10th Generation with A14 processor) is recommended when applying background removal to live view images or videos. Any iPad model released in the last 4 or 5 years should be fast enough for applying background removal to photos.
Click on the "Touchscreen actions..." button to display the Touchscreen Editor to edit touchscreen actions for each of the screens and for surveys and keyboards.
Click on the "Bluetooth commands..." to define commands that are sent to a connected Bluetooth device. Please see the Using Bluetooth for more information.