The print layout editor can be displayed by clicking on the "Print layout" photobooth shortcut button in the main window or by displaying the "Photobooth settings" dialog (File->Photobooth settings...) and clicking on the "Settings..." button to the right of the "Custom layout" checkbox.
Note: if the photobooth shortcut buttons aren't displayed in the main window you can display them by selecting View->Photobooth Shortcuts
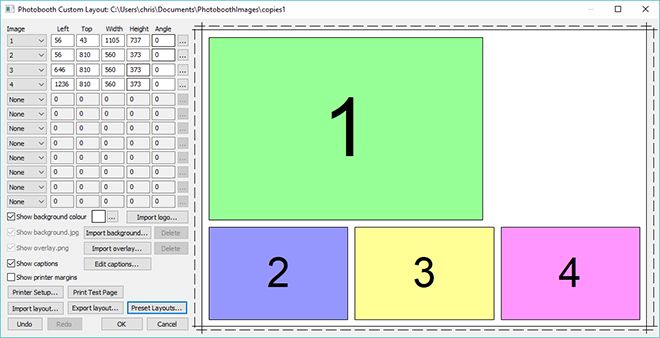
The right hand side of the window displays the print layout. Photos and captions can be edited interactively by clicking on them using a mouse and then dragging to position, resize or rotate them.
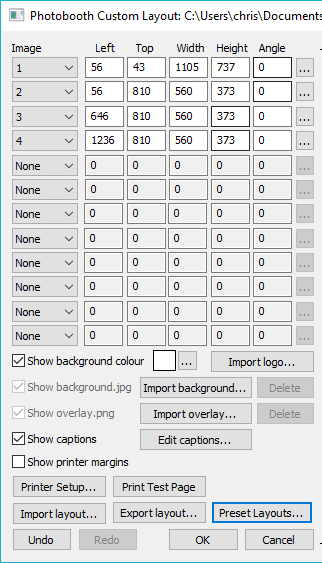
The left hand area of the window contains controls to help with the layout and for loading and saving settings:
A Quick tour of the editor
This section gives a quick overview of some of the ways to edit the layout.
Click on the "Preset layouts..." button, select one of the preset layouts (e.g. "1 large, 3 small") and then click on the "OK" button. The right hand side of the editor should show the page layout similar to the screenshot above.
Left click the mouse on photo 2 to select it:
The photo will be highlighted with a dashed red line to show that it has been selected. It will also have a resize control in each corner and a dashed line in the center with a control for rotating the image.
Move the mouse over the center of the photo (a hand cursor will be displayed) and then click on hold down the left mouse button and drag the photo to a new position and then release the left mouse button. The keyboard cursor keys can also be used to adjust the position of the photo e.g. pressing the left cursor key will move the photo one pixel to the left. Hold the shift key down and press one of the cursor keys to move the photo 10 pixels in that direction.
Resize the photo by moving the mouse over one of the corners of the photo (a resize cursor will be displayed) and then click on hold down the left mouse button and drag the corner to resize the photo and then release the left mouse button.
Rotate the photo by moving the mouse over the control area at the end of the dashed line in the center of the photo (a rotate cursor will be displayed) and then click on hold down the left mouse button and move the mouse to rotate the photo and then release the left mouse button. The keyboard cursor left and right keys can also be used to rotate the photo when the ctrl key is held down e.g. hold down the ctrl key and press the left cursor key to rotate the photo 1/2 degree to the counter clockwise. Hold the ctrl and shift keys down and press cursor left or right to snap the rotation to the nearest 15 degrees and then rotate in 15 degree steps.
Select all the photos by typing Ctrl+A or by right clicking on a photo as selecting "Select all". The selected photos will be highlighted with dashed red lines and can be dragged as a group by holding down the left mouse button.
When a photo is selected it is also highlighted in the image position display in the top left corner of the edit window. The size, position and rotation of the photo can be entered directly by clicking on the "..." button for that image. Click on the dropdown list to change the photo number (or select "None" to remove it or "QR code" set it to a QR code).
Add a caption by clicking on the "Edit captions..." button and the dialog below will be displayed:
Check the "Enable caption" checkbox if it is not already checked. Caption 1 should now be displayed highlighted on the print layout (if it isn't visible click on the "Move to center" button). Type in the edit box to change the caption text or click on the "..." button to the right of the "Font:" label to change the font or to the right of the "Font color:" display to change the color. Click on the "OK" button and the font should remain highlighted. You can drag, resize and rotate the text using the mouse just the as with a photo.
Click on the "Undo" button a few times (or type ctrl+Z) a few times to undo the changes. Then click on the "Redo" button (or type ctrl+Y) to redo the changes.
Note: The dashed line around the layout shows the full printing extent of the printer including any overlap over the edges of the paper for borderless printing. The inner solid line represents the area of the final print.
Printer setup and margins
It is a good idea to check the printer settings and printer margins before designing the layout or running the photobooth setup wizard. To do this click on the "Printer Setup..." button and the "Printer Setup" dialog will be displayed:
Select the required printer from the dropdown list. If your printer isn't listed you may need to install the printer drivers first (please see the Windows help files or printer manuals for information on how to do this).
Click on the "Setup Printer..." button to select the page size, print orientation, print resolution and other printer settings.
Note: if you want to print a double strip of three or four images and are using a dyesub printer that can cut 4"x6" pages into two 2"x6" strips you need to select the 2x6 cut option in the printer driver.
Click on the "Portrait" or "Landscape" radio buttons to change the printer page orientation.
If the selected printer is setup with a page size of 4"x6" and a print resolution of 300 DPI or 600 DPI (most professional dyesub printers support this) the "Center page" button will be enabled. You can press this button to setup the margins to center the page in the printable area. This should produce correctly centered prints with most printers.
Click on the "Test Print" button to print a page to help setup the printer margins. The test print from a DNP DS40 printer will look something like this:
In the enlarged view of the top margin shown below the top margin can be read off the ruler as 14 pixels:
And in the enlarged view of the bottom margin shown below the bottom margin can be read off the ruler as 26 pixels:
Check the top, left, right and bottom margins and enter the values in the printer setup dialog, It is worth spending time setting up the print margins accurately as this will save time later.
Preset Layouts
The "Preset layouts..." button can be used to help design a number of different popular layouts using three or four photos. These include a double strip of three or four photos, a single strip of three or four photos, one large image with a row of three smaller images below and two rows of two images. Simply select the layout you want, adjust the page margins and image spacing and then press the OK button and the software will work out the settings for you:
Select the preset layout from the list of layouts in the top left of the window. The right side of the window shows a preview of the selected layout. The spacing between photos and the top, left, right and bottom margins can be adjusted using the edit boxes on the left of the window.
Note: The dashed line around the layout shows the full printing extent of the printer including any overlap over the edges of the paper for borderless printing. The inner solid line represents the area of the final print.
Click "OK" to copy the layout to the print layout editor.
Editing Photo Positions
A photo can be added to the layout by selecting the photo number from one of the spare image dropboxes showing "None" in the top left corner of the editor window. Alternatively a photo can be hidden by setting its dropdown list to "None".
The size, position and rotation of the photo can be edited by left clicking on the photo to select it and then using the mouse or keyboard cursor keys:
Move the photo by moving the mouse to the center of the photo (a hand cursor will be displayed) then hold down the left mouse button and drag the photo to the new position.
Tip: Hold down the shift key to limit the movement to a horizontal or vertical direction only.
Alternatively use the left, right, up and down cursor keys to move the photo one pixel at a time. Hold down the shift key and use the cursor keys to move the photo 10 pixels at a time.
Resize the photo by moving the mouse to one of the circular control handles in the corners (the resize cursor will be displayed) then hold down the left mouse button and drag the corner to resize the photo. The aspect ratio of the photo will be preserved (i.e. the ratio of the width to the height). Hold down the shift key if to resize the photo without preserving the aspect ratio (this may result in the photos being cropped when they are printed).
Rotate the photo by moving the mouse to the circular control handle at the end of the red dashed line in the center of the photo (the rotate cursor will be displayed) then hold down the left mouse button and move the mouse to rotate the photo.
Alternatively hold down the ctrl key and use the left and right cursor keys to rotate the photo in 1/2 degree increments. Hold down the ctrl and shift keys and use the cursor left and right keys to rotate the photo in 15 degree increments.
Photos are printed in the order in which they are defined and so if the second photo's position overlaps the first photo the second photo will be printed on top of the first photo. You can change the order in which photos are printed by right clicking on a photo and selecting "Move to back", "Move back", "Move forward" or "Move to front".
You can also enter the photo position and angle directly by clicking on the "..." button for that photo on the left side of the editor window and it will display the "Edit Position" dialog:
You can also edit the position by right clicking on the photo and selecting "Edit image position..." from the popup menu.
The left and top entries specify the distance in pixels of the photo from the left and top edges of the page respectively. The layout in the print editor window will be updated automatically as you change the settings. If the photo isn't visible you can press the "Move to center" button to center it on the page.
The width and height entries specify the width and height of the photo in pixels. To preserve the aspect ratio of the photo you can enter 0 for the width or height and the software will replace this with the correct value when you press the "OK" button.
Note: Entering a width and height with a different aspect ratio from the photos taken by the camera (3:2) will result in the photo being cropped when it is printed.
The angle entry specifies the clockwise rotation of the photo in degrees.
A QR code can be added to the layout by selecting "QR code" in one of the spare image dropboxes showing "None" in the top left corner of the editor window. Alternatively the QR code can be hidden by setting its dropdown list to "None". The size, position of the QR code can then be edited in exactly the same way as a photo (described in the section headed "Editing Photo Positions" above).
The text encoded in the QR code can be edited by right clicking on the QR code and selecting "Edit QR code..." from the popup menu. The "QR Code" dialog shown below will be displayed:
Type in the text you want to be encoded in the QR code. Normally this is a URL which needs to be prefixed with http://
The QR code display will be updated automatically as you type in the text. You can test the QR code by pressing the "Test URL" button to open it in a web browser. You can also test the QR code by scanning it with a cell phone.
The error correction dropdown list specifies amount of error correction encoded in the QR code. A "Medium" setting should be suitable for most uses. You may wish to use the "Low" setting if the URL is very long or the QR code is to be printed very small.
Note: The QR code text can also be edited by selecting File->Edit QR code from the main program window.
Adding Logos and Pictures
Click on "Import logo..." to import a PNG or JPEG image into the print layout. Logos can be moved, resized and rotated just like photos in the print layout.
When a logo image is imported the PNG or JPEG image is copied into the current photo booth images folder and its filename is prefixed with "logo_". If the photo booth images folder already contains a file with the same name you are asked whether to overwrite the file. Any copies of the logo in the print layout will be removed from the layout and replaced by a single copy of the new logo image in the center of the layout.
If the photo booth images folder already contains one or more PNG or JPEG images with a logo_ prefix they can be added to the print layout by right clicking on the background of the print layout and selecting "Add logo...".
Please note: logos are added to the print layout after the optional overlay and will appear on top of the photos and overlay.
Editing Caption Positions
Add a caption by clicking on the "Edit captions..." button and the dialog below will be displayed:
You can also edit the caption by right clicking on the caption and selecting "Edit caption..." from the popup menu.
Select the caption you wish to edit using the dropdown box at the top and then check the "Enable caption" checkbox if it is not already checked. The caption should now be displayed highlighted on the print layout (if it isn't visible click on the "Move to center" button). Type in the edit box to change the caption text. Captions span more than one line and can contain tokens such as such as %d for the date and %t for the time the sequence started, {comment} for the comments entered in the main screen and {filename} for the filename used for the JPEG copy of the print layout. Please see the section on tokens for a list of tokens available.
Click on the "..." button to the right of the "Font:" label to change the font, size and style or to the right of the "Font color:" display to change the color.
Use the "Left offset" and "Top offset" entries to specify the position of the text. This is specified in pixels from the top left corner of the page. Use the angle entry to specify the angle of the text. This is specified as degrees rotation in a clockwise direction.
Normally text is left justified (the "Alignment" dropdown list is set to "Left justified") and its position on the screen is measured from the top left corner of the text area.
If the "Alignment" dropdown list is set to "Centered" the text will be center justified and the position will be measured from the top center of the text area.
If the "Alignment" dropdown list is set to "Right justified" the text will be right justified and the position will be measured from the right side of the text area.
Click on the "OK" button to the save the changes. The caption will be selected in the print layout:
The size, position and rotation of the can then be edited using the mouse or keyboard cursor keys similar to moving and resizing photos.
Move the caption by moving the mouse to the center of the caption (a hand cursor will be displayed) then hold down the left mouse button and drag the caption to the new position.
Tip: Hold down the shift key to limit the movement to a horizontal or vertical direction only.
Alternatively use the left, right, up and down cursor keys to move the caption one pixel at a time. Hold down the shift key and use the cursor keys to move the caption 10 pixels at a time.
Resize the caption by moving the mouse to one of the circular control handles in the corners (the resize cursor will be displayed) then hold down the left mouse button and drag the corner to resize the caption.
Alternatively hold down the ctrl key and use the up and and down cursor keys to resize the caption.
Rotate the caption by moving the mouse to the circular control handle at the end of the red dashed line in the center of the caption (the rotate cursor will be displayed) then hold down the left mouse button and move the mouse to rotate the caption.
Alternatively hold down the ctrl key and use the left and right cursor keys to rotate the caption in 1/2 degree increments. Hold down the ctrl and shift keys and use the cursor left and right keys to rotate the caption in 15 degree increments.
Aligning, sizing and moving multiple items
All the currently defined photos, captions and QR codes can be selected by typing ctrl+A (or by right clicking and selecting "Select all"). Alternatively just photos can be selected by typing Ctrl+P (or by right clicking and selecting "Select all photos"). You can refine the selection by holding down the ctrl key and clicking on the item to be added or removed from the selection.
Tip: All captions can be selected by typing Ctrl+P to select all photos followed by Ctrl+I to invert the selection (this will unselect all photos and select all captions).
A group of selected images can be moved by holding down the left mouse button and dragging them to the new position or by using the keyboard cursor keys.
There are various options for aligning a group of selected items e.g. left align so that a group of images are arranged in a column. To align the currently selected elements right click the mouse on the reference element and select the required alignment from the "Alignment" menu of the popup menu. The selected elements will be moved to align them with the reference element.
Note: If this doesn't produce the required result simply type ctrl+Z to undo the changes.
A group of photos can be spaced evenly by selecting them in order and then right click on any of the selected images and select "Space photos evenly". The order in which the photos are selected is important because the middle photos will be spaced evenly between the positions of the first and last photos in the selection. To select the photos in the right order simply left click on the first photo and then add the remaining photos to the selection in order by holding down the ctrl key and clicking on them.
A group of photos can be set to the same size and angle as a reference photo by selecting them and then right clicking on the reference photo and selecting "Make photos same size and angle".
Background Color and background.jpg
Normally the page background is white but it can be set to any color by clicking on the "..." button next to the colored square besides the "Show background color" checkbox.
A JPEG image named background.jpg can also be used as a background. This is useful for adding logos or fancy captions to the print or to add frames around the photos. Ideally the background.jpg should be the same size in pixels as the printed output (e.g. 1844 x 1240 pixels for a 6"x4" print from a DNP DS40 printer). The background.jpg will be centered on the page and so if it is bigger the excess will be cropped from the top, left, right and bottom or if it is smaller it won't fill the page.
Tip: Set the background color to the same color as the edges of the background.jpg to avoid white strips on the edges of the page if the background.jpg doesn't fill it.
The background.jpg should be saved in your photobooth images folder (this is displayed in the title bar of the print layout editor window). You can copy a JPEG image into your photobooth images folder by clicking on the "Import background..." button.
To delete a background.jpg image first press the "OK" button to save the print layout and close the print layout editor window. Then delete the background.jpg from your photobooth images folder.
Note: If the positions of photos and captions don't quite line up with an imported background.jpg they can be moved by typing ctrl+A (to select all) and then pressing the cursor keys.
Headers and footers
For backwards compatibility with previous releases the print layout can also display a header image named header.jpg at the top of the page and a footer image named footer.jpg at the bottom of the page. It is recommended that you avoid using headers and footers and use the background.jpg instead. This will make it easier save layouts for future reference without them being specific to a particular printer model.
Overlay
An option overlay can be placed over the photos by placing an PNG image named overlay.png in your photobooth images folder. You can copy a PNG image into your photobooth images folder by clicking on the "Import overlay..." button.
The overlay.png should be saved as a 24-bit color PNG file with an 8-bit alpha channel containing transparency information.
To delete an overlay.png image first press the "OK" button to save the print layout and close the print layout editor window. Then delete the overlay.png from your photobooth images folder.
There is an example PNG file named example_overlay.png in the installation folder which can be used for testing.
Tip: The current layout can be saved as a JPEG file by holding down the Shift and Ctrl keys and then clicking on the "Print Test Page" button. This JPEG image can then be loaded into a photo editor such as Photoshop to add logos, captions etc. and then saved as a background.jpg or overlay.png image which can be imported into the layout.
Hiding and showing elements
Use the various "Show" checkboxes to control what is displayed in the print layout preview. This is useful if you want to simplify the preview display to make it easier to adjust the photo positions.
Please note: Unchecking the "Show" checkbox for an element only affects the print layout preview and does not affect the final prints.
Undo and Redo
Most actions can be undone by clicking on the "Undo" button or by typing ctrl+Z and redone by clicking on the "Redo" button or typing ctrl+Y.
You can't undo the "Printer setup", "Import background...", "Import overlay..." or "Import layout..." actions.
Exporting and importing layouts
You can save a print layout for future reference by clicking on the "Export layout..." button. This will save the entire layout including any overlay and background images to a single file with a .pblt file extension.
A previously saved layout can be imported by clicking on the "Import layout..." button. It should be possible to import layouts defined for any similar printer (i.e. one with the same page size and print resolution) provided the print margins were set accurately.
Please note: If your photobooth images folder contains a background.jpg or overlay.png image they will be deleted or overwritten when importing a print layout.