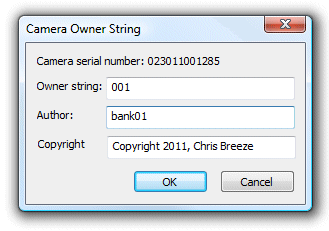
It is recommended that each camera is identified by setting a number in the camera author string. This can be done by selecting each camera in turn using the "Camera:" drop down list and then selecting "Edit Camera Id..." from the Camera menu. The author string is stored in the camera even when it is turned off and so it only needs to be set once. Some cameras will only save the author string if they are turned off using the power switch on the camera. The setting may not be saved if the cameras are powered using external power adapters and the power is turned off.
e.g. If there are 12 cameras being used the cameras could be numbered 01, 02, 03, 04, 05, 06, 07, 08, 09, 10, 11, 12
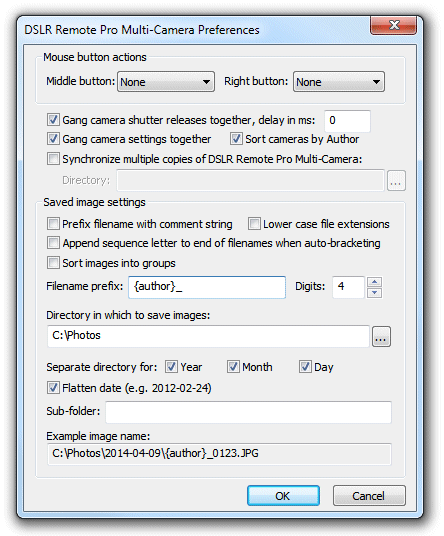
In Preferences set the filename prefix to {author}_. This will result in each image filename being prefixed with the camera author string.
e.g. With 4 cameras with author strings set to 01, 02, 03 and 04 the downloaded images would have the names like:
01_0001.JPG, 02_0001.JPG, 03_0001.JPG, 04_0001.JPG (first shot in the directory)
01_0002.JPG, 02_0002.JPG, 03_0002.JPG, 04_0002.JPG (second shot in the directory)
The image number can be placed at the start of the filename by using the %# token. This is useful if more than one shot from each camera is saved to the same directory as it means that sorting images into alphabetical order will give the order in which the pictures were taken.
e.g. With 4 cameras with author strings set to 01, 02, 03 and 04 setting the prefix to %#_{author} would result in names like:
0001_01.JPG, 0001_02.JPG, 0001_03.JPG, 0001_04.JPG (first set of shots in the directory)
0002_01.JPG, 0002_02.JPG, 0002_03.JPG, 0002_04.JPG (second set of shots in the directory)
Sorted alphabetically this gives:
0001_01.JPG (camera #01, image #1)
0001_02.JPG (camera #02, image #1)
0001_03.JPG (camera #03, image #1)
0001_04.JPG (camera #04, image #1)
0002_01.JPG (camera #01, image #2)
0002_02.JPG (camera #02, image #2)
0002_03.JPG (camera #03, image #2)
0002_04.JPG (camera #04, image #2)
The comment string entered in the main window can be added to the filename. This can be done either by selecting the option to prefix the filename with the comment string in preferences or by using the {comment} token when specifying the filename prefix. This is useful for product photography when the product part number is entered in the comment field.
Owner, Author and Copyright strings
Newer camera models allow strings for the owner, author and copyright information to be stored in the camera and written to the shooting data in JPEG and raw files. The author and copyright strings can be set using the normal camera controls (please see the camera manual for details). Alternatively the owner, author and copyright strings can be set for each camera in turn using camera drop down list in the main window and then selecting "Edit Camera Id..." from the "Camera" menu:

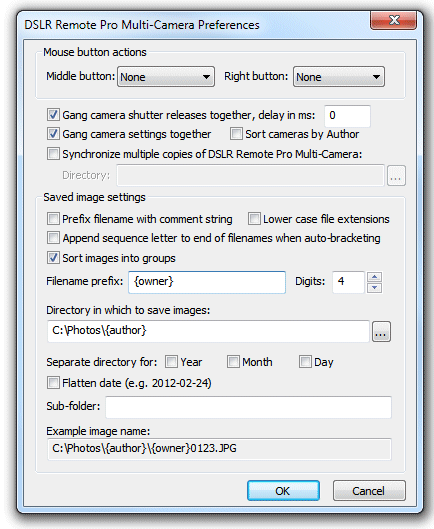
The owner, author and copyright strings can accessed using the {owner}, {author} and {copy} tokens respectively when specifying the filename prefix and download directory.
For example if you have several cameras arranged in different groups and wish to download the images from each group to different folders you might set the download directory to "C:\Photos\{author}"
and the filename prefix to "{owner}_":

The author string can also be used for naming the photos from each camera. This is more convenient than using the camera owner string because you can edit the author string using the camera controls when the camera is not connected to a computer or from the computer (by selecting Camera->Edit camera id...). The camera owner string can only be edited by connecting the camera to a computer. To use the author string to name the photos set the "Sort cameras by Author" setting in preferences so that the dropdown list of cameras in the main window is sorted by author string not owner string. Then set the filename prefix to {author}_
