Please note: Breeze Booth for iPad v3.2 onwards supports a direct USB connection between a Canon camera and the iPad (see Using an external camera). You can still use the old method of connecting the camera to a Windows PC running the CameraController utility described on this page, but it is not recommended.
You need to use an external camera controller which is connected to the camera via USB and to the iPad via a wired or wireless network.
The external controller can be a Windows PC (e.g. an Intel ComputeStick or a mini PC) or a Raspberry Pi single board computer. A Windows PC is easier to set up than a Raspberry Pi and has the advantage that it can also be used to control the iPad. The Raspberry Pi has the advantage that it is compact, low cost and requires little or no maintenance once set up.
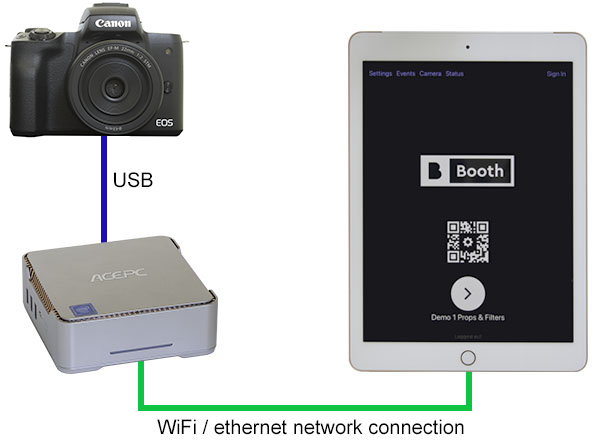
Mini Windows PC running the camera controller
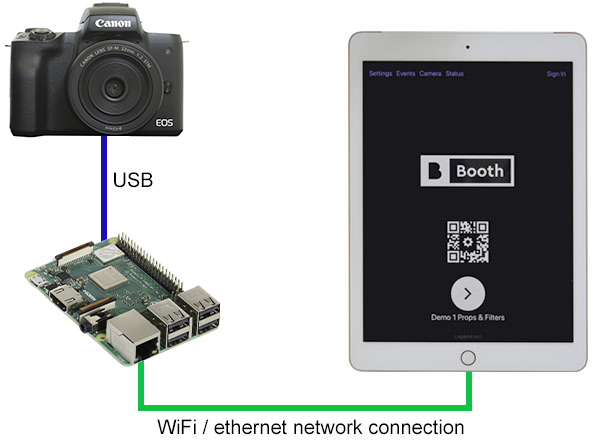
Raspberry Pi running the camera controller
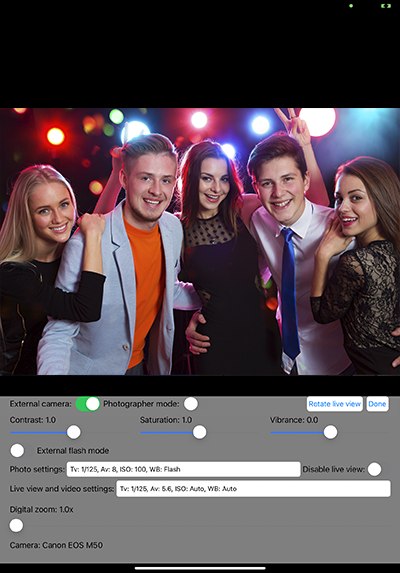
To enable a connection to an external camera click on "Camera Settings" at the top of the start screen in Breeze Booth for iPad and then select external camera:
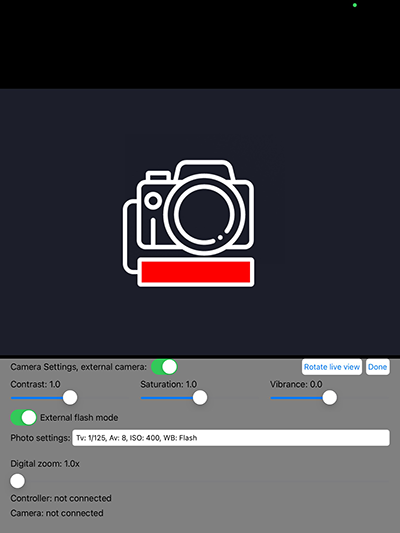
The camera settings screen will display a graphic showing a camera with a red box underneath if it is not connected to the camera controller.
Connect the Windows PC or Raspberry Pi controlling the camera to the same network as the iPad using a wifi or wired connection and run the camera controller app. The iPad should connect to the camera controller after 5 to 10 seconds. The connection status is shown at the bottom of the camera settings screen. In the screenshot above the status is shown as "Controller: not connected" and "Camera: not connected".
The screenshot below shows the iPad connected to the camera controller with no camera connected. The status at the bottom of the screen shows "Controller:" followed by the version of the camera controller software and the iPad of the Windows PC or Raspberry Pi it is running on:
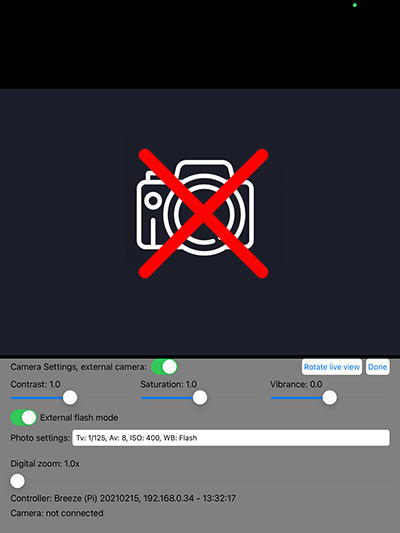
Connect the camera to the Windows PC or Raspberry Pi running the camera controller software using a USB cable and turn the camera on. After a few seconds the graphic showing a camera with a red X will be replaced with live view images from the camera.
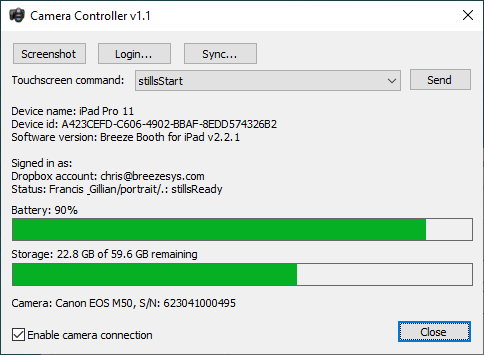
The screenshot below shows the iPad connected to the camera controller with live view images being displayed from the connected camera:
The status line at the bottom of the window will show the camera model.
The Windows version of the camera controller will run on any desktop version of Windows. It does not require a powerful PC and will run on low cost Intel Atom based or Intel Celeron based computers such as ComputeSticks or mini PCs.
To install the camera controller simply download and install the Event Editor (this can be downloaded here).
When you run the camera controller for the first time you may receive a warning message from the firewall software running on the computer e.g.
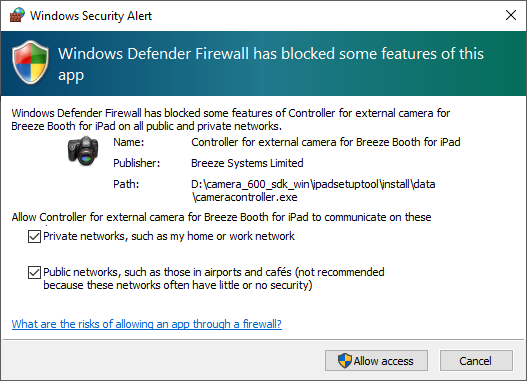
This is normal because the camera controller needs to access the network in order to communicate with the iPad. Please allow the camera controller access to the network.
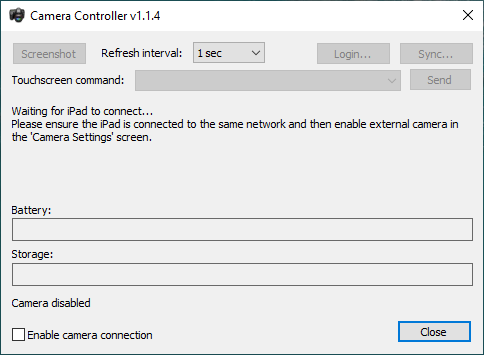
The screenshot below shows the camera controller running without a network connection to an iPad or a USB connection to a camera:
Run Breeze Booth for iPad on the iPad, tap on "Camera Settings" in the start screen and then select "External camera". After a few seconds the iPad should connect and the camera controller screen will look something like this:
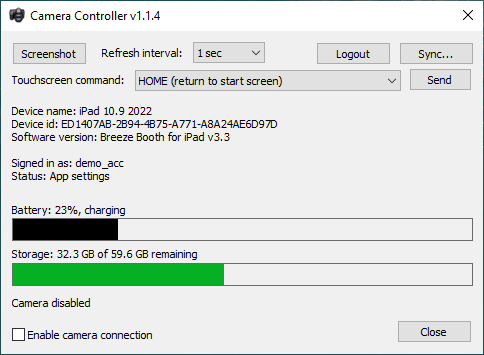
The controls at the top of the window are for monitoring and controlling the app and are described in the next section: Remote control and monitoring of the iPad
The rest of the windows displays status information about the iPad that's connected to the camera controller e.g. its name, battery state and amount of free storage.
The final line shows the camera status. In the screenshot above this displays "Detecting camera" because the camera was not connected at this point.
Connect the camera to the Windows PC using a USB cable and turn the camera on. The camera controller should automatically detect the camera and connect to it and then the iPad should start displaying live view images after a few seconds. When the camera is connected the camera controller window will look something like this:
Notes for setting up a dedicated Windows based camera controller
| 1. | Set up the PC to auto run when the power is turned on. This is normally a setting in the computer's BIOS |
| 2. | Create a new user account which does not have administrator rights and set this up to automatically login when Windows starts up |
| 3. | Create a shortcut in the Windows startup folder to run the camera controller automatically when Windows starts up. You can do this by typing Windows+R to display the "Run" window and then enter shell:startup |
| 4. | Go to Settings->Updates & Security and click on Advanced options to pause Windows updates. This allows Windows updates to be paused for up to 35 days and to prevent automatic updates from disrupting the PC during an event Alternatively you can disable automatic Windows updates by disabling the update service. An internet search for "disable windows 10 updates permanently" should provide details on how to do this. |
Raspberry Pi Camera Controller
You can also use a Raspberry Pi single board computer to control the camera. To do this you need a Raspberry Pi 4 Model B with 2GB or more of memory and a 8GB micro SD card.
First install Raspberry Pi OS 32-bit on the micro SD card by running the Raspberry Pi Imager: https://www.raspberrypi.org/software/
Next connect HDMI, keyboard and mouse to Raspberry Pi and power up. Follow the on screen instructions to change the password and update the operating system.
Reboot and run the Raspberry Pi Configuration tool (Pi->Preferences->Raspberry Pi Configuration) to select the following settings:
| • | Boot to desktop |
| • | Boot as current user |
| • | Enable ssh and VNC interfaces |
Open a terminal window and rename or delete the following file: /usr/lib/gvfs/gvfs-gphoto2-volume-monitor
e.g. run the command:
sudo rm /usr/lib/gvfs/gvfs-gphoto2-volume-monitor
Next download and install Breeze Camera by running the following commands:
wget https://bb4ipad.com/breeze_camera.tgz
tar xvzf breeze_camera.tgz
./run_breeze_camera.bash install
sudo reboot
Connect the Raspberry Pi to the same network as the iPad using a wired connection or by wifi. Then connect the camera to the Raspberry Pi using a USB cable and turn the camera on. Open the camera settings screen in Breeze Booth for iPad and select "external camera". After a few seconds the iPad should connect to the camera controller and start displaying live view images from the camera.
The Raspberry Pi can also be used as an AirPrint print server by enabling CUPS. Details of how to set this up are beyond the scope of this help file. Please search the internet for "Raspberry Pi AirPrint" for information on how to set up a Raspberry Pi as an AirPrint server.
Troubleshooting
If the iPad displays the camera icon with a red rectangle underneath it means that the app hasn't connected to the camera controller. Check that the Raspberry Pi and the iPad are connected to the same network.
If the iPad displays the camera icon with a red cross it means that the app has connected to the camera controller but the camera controller is not connected to the camera. Check that the camera is connected to a USB port on the Raspberry Pi and is turned on. Then try turning the camera off for a few seconds and then turn it on again.
For best results you need a fast reliable network connection between the iPad and the camera controller to give a smooth live view display. Both the iPad and the camera controller need to be connected to the same network to work.
One option is to use a cellular iPad and set it up as a personal hotspot and then connect the camera controller via wifi. This will allow the iPad to connect to the internet for sharing photos and to the camera controller to control the camera.
Another option is to use a mobile hotspot (or "MiFi") to provide the internet connection and to connect iPad and the camera controller to the hotspot using wifi.
Some mobile hotspots have an ethernet connection which allows the camera controller to use a wired network connection to the hotspot. This configuration should give better performance than using wifi for both the iPad and the camera controller.
Another option is to use a router which takes a data SIM to provide the internet connection. These usually support multiple wired connections allowing both the camera controller and the iPad to be connected using a wired connection. To do this you will need a suitable lightning to ethernet adapter (or USB C to ethernet adapter if you are using an iPad Pro). This should provide the fastest and most reliable set up of the options outlined above.
If you are running firewall software on the Windows PC or Raspberry Pi you may need to configure it manually to allow the camera controller software to access the network and communicate with the iPad. The camera controller requires the following network access:
| • | Port 5010: UDP out |
| • | Port 5011: TCP in/out |
Canon EOS R5
Canon EOS R6
Canon EOS R6 Mark II
Canon EOS R7
Canon EOS R10
Canon EOS R
Canon EOS RP
Canon EOS-1DX Mark II
Canon EOS-1DC
Canon EOS-1DX
Canon EOS-1Ds Mark III
Canon EOS-1Ds Mark II
Canon EOS-1D Mark IV
Canon EOS-1D Mark III
Canon EOS 5DS R
Canon EOS 5DS
Canon EOS 5D Mark IV
Canon EOS 5D Mark III
Canon EOS 5D Mark II
Canon EOS 6D Mark II
Canon EOS 6D
Canon EOS 7D Mark II
Canon EOS 7D
Canon EOS 90D
Canon EOS 80D
Canon EOS 77D/EOS 9000D
Canon EOS 70D
Canon EOS 60D
Canon EOS 50D
Canon EOS 40D
Canon EOS 30D
Canon EOS 4000D/EOS 3000D/Rebel T100
Canon EOS 2000D/EOS 1500D/Rebel T7/Kiss X90
Canon EOS 1300D/Rebel T6/Kiss X80
Canon EOS 1200D/Rebel T5/Kiss X70
Canon EOS 1100D/Rebel T3/Kiss X50
Canon EOS 1000D/Rebel XS/Kiss F
Canon EOS 250D/Rebel SL3/Kiss X10/200D Mark II
Canon EOS 200D/Rebel SL2/Kiss X9
Canon EOS 100D/Rebel SL1/Kiss X7
Canon EOS 850D/Rebel T8i/Kiss X10i
Canon EOS 800D/Rebel T7i/Kiss X9i
Canon EOS 760D/Rebel T6s/EOS 8000D
Canon EOS 750D/Rebel T6i/Kiss X8i
Canon EOS 700D/Rebel T5i/Kiss X7i
Canon EOS 650D/Rebel T4i/Kiss X6i
Canon EOS 600D/Rebel T3i/Kiss X5
Canon EOS 550D/Rebel T2i/Kiss X4
Canon EOS 500D/Rebel T1i/Kiss X3
Canon EOS 450D/Rebel XSi/Kiss X2
Canon EOS 400D/Rebel XTi/Kiss X
Canon EOS M6 Mark II
Canon EOS M200
Canon EOS M50 Mark II/Kiss M2
Canon EOS M50/Kiss M
Canon PowerShot SX70 HS
Canon PowerShot G5 X Mark II
Canon PowerShot G7 X Mark III