The screen settings can be adjusted by clicking on the "Setup..." button in the main window to display the properties dialog:
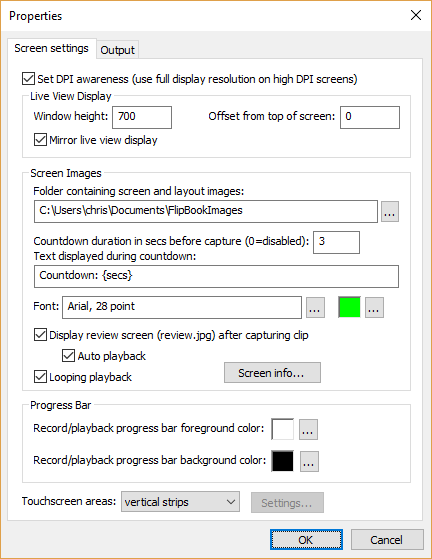
Some tablets and laptops have very high resolution screens and the way Windows displays applications will depend on whether they are "DPI aware" or not. Older applications which are not high DPI aware are scaled up to avoid the text being too small to read. This means that the resolution of the screen available to the application is less than the actual screen resolution. The amount of display scaling depends on the "size of text, apps and other items" setting in the Windows display settings.
Newer applications that are high DPI aware automatically scale the text so that it can be read and can use the full resolution of the screen.
Flip Book Photobooth has the option to operate as a "DPI aware" application and use the full screen resolution or to behave like a legacy application with a display that is scaled by Windows.
Example: Microsoft Surface Pro 4 tablet has a screen resolution of 2736x1824 pixels
If Flip Book Photobooth is run with the "Set DPI awareness" option set the screen images used in photo booth mode will need to be 2736x1824 pixels in size to fill the screen.
If the "Set DPI awareness" option is not set the size of the screen images will depend on the "size of text, apps and other items" selected in the Windows display settings:
If it is set to 150% the screen images need to be 1824x1216 pixels
If it is set to 200% the screen images need to be 1368x912 pixels
Recommendation: select the "DPI aware" setting for all new screen designs and only disable it if you have old designs which don't fill the screen (you may also need to adjust the "size of text, apps and other items" Windows display setting)
Live View Display
The "Window height" specifies the height of the live view display and should be less than the height of the screen. The width of the live view images will depend on whether they have been rotated or cropped. The live view display is always centered horizontally and its vertical position can be adjusted using the "Offset from top of screen setting".
Most people are more used to seeing themselves in mirrors and may get confused as to which way to move if they see the live view images straight from the camera. The "Mirror live view display" option will mirror the live view display so that the images appear the same as they would in a mirror.
Screen Images
Flip Book Photobooth will display basic screens to the user showing the state of the photo booth and which keys to press. These can be replaced with user defined JPEG images to customize the look of the photo booth.
The following screens can be defined:
ready.jpg - the main startup screen when the photo booth is ready for the next capture but is not displaying live view images
start.jpg - screen displayed when the photo booth is displaying live view images and is ready to capture the next sequence
countdown.jpg - screen displayed during the countdown before capturing a clip
capturing.jpg - screen displayed while capturing a clip
review.jpg - optional screen displayed after capturing a clip
replay.jpg - screen displayed after capturing a clip or when replaying a previously captured clip
printing.jpg - screen displayed while the flip book is being printed
camera_not_connected.jpg - screen displayed when the camera is not connected or is turned off
Normally the ready.jpg screen is displayed after capturing a clip and has options to shoot another clip, play the clip that has just been captured or to print a flip book. If the "Display review screen (review.jpg) after capturing clip" option is selected the review.jpg screen will be displayed instead. The review screen has options to return to the main menu (i.e. the ready.jpg screen), play the clip that has just been captured or to print a flip book.
To define custom screens first specify the folder to use by clicking on the "..." browse button. Then create suitable JPEG screen images using the names above and save them in the screen folder. The JPEGs should be the same size as the PC's screen. This can be displayed by clicking on the "Screen info..." button.
Using movie files to animate screens
Movie files can be displayed on the screens by placing a movie file in MP4 or QuickTime MOV format in the screen images folder and giving it the same name as the screen image. For example, to play an MP4 movie file when the ready.jpg screen is displayed the movie file should be named ready.mp4. Movie files can't overlap the live view display and so if live view is active the movie will be displayed in the area below the live view.
Append "_loop" to the filename , e.g. ready_loop.mp4, if you want the movie to automatically restart from the beginning and play continuously.
By default movie files are displayed centered on the screen unless live view is active in which case they are displayed below the live view. Movie files can also be positioned manually by appending the offsets from the left and top of the screen to the filename in the form _{LeftOffset}+{TopOffset} e.g. to position the ready.mp4 movie 200 pixels from the left of the screen and 100 pixels from the top the file should be named ready_200+100.mp4 (or ready_loop_200+100.mp4 if you want it to play continuously). If the movie is larger than the screen it will be automatically scaled to fit the screen.
Troubleshooting: If a video does not play properly it could be a video CODEC problem. Please try downloading and installing the K-Lite CODEC pack which should fix the problem.
The K-Lite CODEC pack can be download it from: http://www.codecguide.com/download_kl.htm
Countdown Text
Set the number of seconds in the "Countdown duration" text box to display countdown text before starting the clip capture. Then specify the countdown text to be displayed in the "Text displayed during countdown" edit box. The token {secs} is replaced by the number of seconds remaining before the capture starts. Click on the "..." buttons to specify the font type, size and color for the countdown text.
The countdown text is displayed below the live view images. If the live view images have an offset from the top of the screen and there is more space above the live view images than below them the countdown text will be displayed above the live view images.
Progress Bar
A progress bar is displayed along the bottom of the screen during recording and playback. The color can be specified by clicking on the "..." buttons to the right of the foreground and background displays. The progress bar display can be disabled by setting the foreground and background colors to the same color.
Touchscreen Areas
Flip Book Photobooth can be operated using a touchscreen and following the prompts in the default screen layouts. The touchscreen areas can be setup to divide the screen into three vertical columns (the default setting) or three horizontal rows. The prompts in the default screen layouts will be displayed across the bottom of the screen when the vertical strips option is selected and down the left hand side of the screen when the horizontal strips option is selected.
Alternatively up to 18 user defined areas can be defined on a touchscreen to control the different settings. First select the "user defined" option in the "Touchscreen areas" dropdown list and then click on the "Settings..." button to display the touchscreen settings dialog:

Select the action using the dropdown lists on the left and the area on the touchscreen that activates the action using the corresponding "Left", "Top", "Right" and "Bottom" edit boxes. The values entered in the edit boxes are the screen coordinates in pixels with the origin in the top left corner. The example in the screenshot above defines several touchscreen areas including the following actions when the ready.jpg screen is displayed:
| 1. | An action to switch from the ready screen to the start screen that fills most of the screen |
| 2. | A smaller area on the right of the screen to exit full screen mode |
Touchscreen actions can also be viewed or edited interactively using a mouse by clicking on the "Show/edit touchscreen areas..." button. When the touchscreen action editor is first opened it will display the ready.jpg screen and the touchscreen actions for as boxes with white outlines and green text indicating the action. The action can be moved by clicking in the box and moving the mouse with the left button held down. The size of the box can be adjusted by dragging the corners with the left mouse button held down. Touchscreen actions can be deleted by right clicking on the action and selecting "Delete action" from the menu. New actions added by right clicking the mouse and selecting the "Add action...". Different screens can be displayed by right clicking the mouse and selecting the required screen.
Exit the touchscreen action editor by pressing the escape key or by right clicking the mouse and selecting "Exit" from the menu. If the touchsrceen actions have been modified a confirmation dialog will be displayed asking you if you want to save the changes.
Please note: the touchscreen action editor only edits the positions of the touchscreen actions. It doesn't edit the JPEG screen images which display the graphics for the touchscreen buttons - to do this you need to use an image editor such as Photoshop Eelements.
An optional password can be used to protect the "Exit full screen mode" action by entering the password in the "Photo booth exit action password" field. Many photo booth operators define a secret touchscreen action on the screen to exit photo booth mode which can cause problems if users find it because it will allow them to break out of full screen mode. Using a password to protect this should prevent problems if users manage to find the secret exit photo booth mode touchscreen action.