Up to 10 screens can be displayed to gather information from users before starting the photo booth shooting sequence. The survey screens are defined in the same way as the touchscreen keyboard and can include checkboxes, text entry areas and keys. Information entered by the user is stored in the XML photobooth summary file which is saved after each shooting sequence.
The survey screens are shown at the start of the photo booth shooting sequence before taking the photos. To enable a survey first make sure user survey screens are enabled in the "Touchscreen Settings" dialog then create the files defining the touchscreen keyboard to be used for the survey.
An email can be sent automatically using the email address entered in the survey data by setting the id of the input prompt to "autoEmail" (see touchscreen keyboard text input for details).
Adding a simple survey screen
A simple survey screen with a checkbox, text entry field and optional information screen can created using the "Add Survey Keyboard" dialog. This can be displayed by going to the "Touchscreen Settings" dialog and clicking on the "Test keyboard..." button and selecting "Add survey keyboard...":
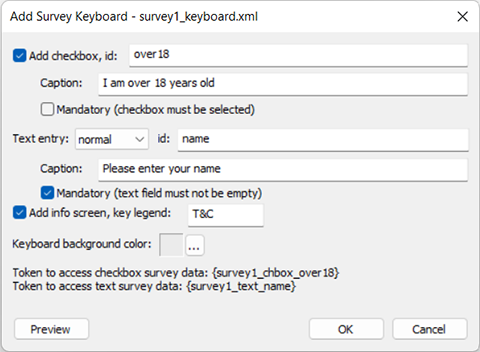
Select "Add checkbox" to display a checkbox in the survey. Set the id to identify the input and edit the caption to be displayed beside the checkbox e.g. set the caption to "Display your photo in the online gallery" and the id to "gallery". Select "Mandatory (checkbox must be selected)" if the user must select the checkbox before continuing e.g. if the checkbox is asking whether they accept the terms and conditions of using the photo booth they must accept them before continuing.
Set the "Text entry:" dropdown to the type of text entry field to display a text entry box in the survey screen and a keyboard to enter the text. The following text entry options are available:
none - do not display a text entry field or keyboard
normal - add a text entry field that allows free text entry
email - add a text entry field that allows an email address to be entered. An error message will be displayed if the user enters an invalid email address and tries to continue
autoemail - the same as "email" above plus the output from the photo booth will be automatically emailed to the guest.
Set the id to identify the input and the caption to be displayed above the text entry field e.g. set the caption to "Please enter your name" and the id to "name". Select "Mandatory (text field must not be empty)" if the user must enter some text before continuing
Please note: when autoemail is selected the id is automatically set to autoemail and cannot be changed.
Select "Add info screen" to add a button to display an information screen and set the key legend e.g. "T&C" to display a terms a conditions screen. This will create a screen named survey1_keyboard_info.jpg. This screen can be edited using an image editor such as Photoshop to display the required information.
The tokens that can be used to access information entered in the survey are displayed in the dialog e.g. if the id of the text entry field is set to "name" the the token to access this information would be {survey1_text_name}. This can be used in print captions to print the user's name on the photos or it can be included in an email.
Click on the "..." button to the right of the keyboard background color to select a background color for the keyboard.
The survey keyboard can be previewed by pressing the keyboard button. The settings shown above produce a survey keyboard like the one below:
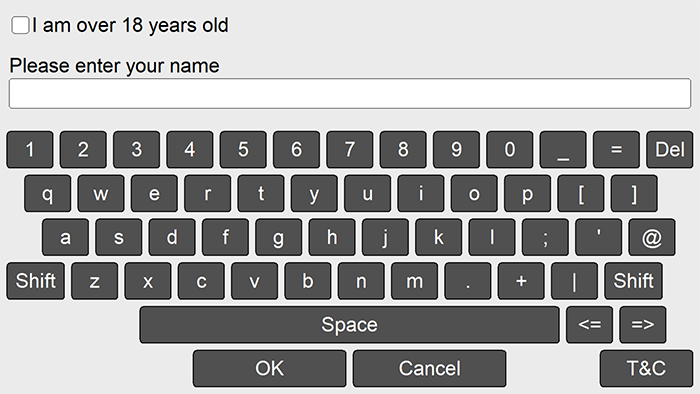
Press the OK button to create the survey keyboard. For the first survey scree, survey1, this will create a file named survey1_keyboard.xml which contains the information to display the survey keyboard. It will also create a JPEG screen imaged named survey1_keyboard_info.jpg if the info checkbox was selected.
Additional survey screens can be created by selecting "Add survey keyboard..." again in the "Touchscreen Settings" dialog.
The rest of this page provides more information on how to customize survey screens and some examples.
Files used to define survey screens
The user survey screens are defined using XML touchscreen keyboard definition files and optional TIFF or JPEG image files stored in the photo booth images folder e.g. the first survey screen can be defined using the following files:
survey1_keyboard.xml - touchscreen keyboard definition file for survey screen 1
survey1_keyboard_lowercase.tif - optional TIFF keyboard image showing lower case keys
survey1_keyboard_lowercase_pressed.tif - optional TIFF keyboard image showing lower case keys when a key is pressed
survey1_keyboard_uppercase.tif - optional TIFF keyboard image showing upper case keys
survey1_keyboard_uppercase_pressed.tif - optional TIFF keyboard image showing upper case keys when a key is pressed
Multiple survey screens can be defined by incrementing the screen number e.g.
survey1_keyboard.xml - touchscreen keyboard definition file for survey screen 1
survey2_keyboard.xml - touchscreen keyboard definition file for survey screen 2
survey3_keyboard.xml - touchscreen keyboard definition file for survey screen 3
...
survey10_keyboard.xml - touchscreen keyboard definition file for survey screen 10
survey1_keyboard_info.jpg or survey1_keyboard_info.tif - optional information page for survey screen 1
survey2_keyboard_info.jpg or survey2_keyboard_info.tif - optional information page for survey screen 2
survey3_keyboard_info.jpg or survey3_keyboard_info.tif - optional information page for survey screen 3
...
survey10_keyboard_info.jpg or survey10_keyboard_info.tif - optional information page for survey screen 10
Note: the number can be omitted from the first survey screen e.g. survey_keyboard.xml
The user survey screens can be enabled or disabled in the "Touchscreen Settings" dialog or read from a settings file.
Options for closing the survey screens
Define a key with the action "OK" to accept the input from the survey screen. If the survey screen includes any mandatory input fields it will only close if these have been completed. When the screen closes the next survey screen in the sequence will be displayed or, if this is not defined, the photo booth will start the shooting sequence.
Define a key with the action "Cancel" to close the survey screen without saving the user input. When the screen closes the next survey screen in the sequence will be displayed or, if this is not defined, the photo booth will start the shooting sequence.
Define a key with the action "Close" to close the survey screen without saving the user input and return to the ready screen
Format of saved survey data
The information entered by the user is saved in the XML summary file stored in the same folder as the photos downloaded from the camera. The information is stored within the <survey_data> tags using tags which define the survey screen number, the input field and the optional id field to help identify the data. An example XML summary file created from two survey screens is shown below:
<?xml version="1.0" encoding="UTF-8"?>
<breeze_systems_photobooth version="3.7.1">
<photo_information>
<date>2017/06/07</date>
<time>17:09:05</time>
<user_data/>
<survey_data>
<survey1_chkbox1 id="over21">1</survey1_chkbox1>
<survey1_chkbox2 id="agree">1</survey1_chkbox2>
<survey1_chkbox3 id="share">0</survey1_chkbox3>
<survey2_text1 id="name">Chris Breeze</survey2_text1>
<survey2_chkbox1 id="test">0</survey2_chkbox1>
</survey_data>
<prints>1</prints>
<photobooth_images_folder>C:\Users\chris\Documents\PhotoboothImages\survey_example</photobooth_images_folder>
<digital_zoom>100</digital_zoom>
<mirror_output>0</mirror_output>
<camera_orientation>0</camera_orientation>
<bw_mode>0</bw_mode>
<photos>
<photo image="1">IMG_0001.JPG</photo>
<photo image="2">IMG_0002.JPG</photo>
<photo image="3">IMG_0003.JPG</photo>
<output>prints\170607_170905.jpg</output>
</photos>
</photo_information>
</breeze_systems_photobooth>
Survey screen 1 contained three checkboxes with ids "over18" (set by the user), "agree" (set by the user) and "share" (not set by the user). Survey screen 2 contained a text entry area with id "name" (set to "Chris Breeze") and a checkbox with id "test" (not set by the user).
<survey2_text1 id="name">Chris Breeze</survey2_text1>
Displaying user survey data on the prints
User survey data can be displayed on the prints by using tokens in the caption text. The tokens should be enclosed with curly brackets and given the same names as the tags used to store the information in the XML summary file e.g. {survey2_text1} will display the name entered by the user in survey screen 2 in the example above.
You can also use the id to access the survey data using a token with the survey screen and input type followed by the id e.g. {survey2_text_name}
Information from checkboxes can also be included in the caption text e.g. {survey1_chkbox1} will display the user's response to the "over 21" checkbox in the first survey screen. This will display 1 if the checkbox was selected or 0 if it was not selected.
You can also use the id to access the survey data using a token with the survey screen and input type followed by the id e.g. {survey1_chkbox_over21}
The {survey1_chkbox1} token can be combined with other tokens to provide a more meaningful response e.g. suppose the photo booth print is to be used as a drinks voucher and you only want to offer alcoholic drinks to people over 21 you could set the caption text to {if,{survey1_chkbox1},Voucher for alcoholic cocktail, Voucher for soda}.
The five survey results in the example above can be accessed using the following tokens:
{survey1_chkbox1} or {survey1_chkbox_over21}
{survey1_chkbox2} or {survey1_chkbox_agree}
{survey1_chkbox3} or {survey1_chkbox_share}
{survey2_text1} or {survey2_text_name}
{survey2_chkbox1} or {survey2_chkbox_test}
Example 1: Simple terms and conditions screen
Create a survey_keyboard.xml like the one below in the photobooth images folder:
<?xml version="1.0" encoding="UTF-8"?>
<breeze_systems_photobooth>
<photobooth_settings>
<keyboard>
<key>
<left>20</left>
<top>20</top>
<width>320</width>
<height>120</height>
<legend>Agree</legend>
<shifted_legend>Agree</shifted_legend>
<code>OK</code>
<shifted_code>OK</shifted_code>
</key>
<key>
<left>360</left>
<top>20</top>
<width>320</width>
<height>120</height>
<legend>Decline</legend>
<shifted_legend>Decline</shifted_legend>
<code>Close</code>
<shifted_code>Close</shifted_code>
</key>
</keyboard>
</photobooth_settings>
</breeze_systems_photobooth>
Then create TIFF keyboard image files (survey_keyboard_lowercase.tif, survey_keyboard_lowercase_pressed.tif, survey1_keyboard_uppercase.tif and survey1_keyboard_uppercase_pressed.tif) and edit these in an image editor to add the terms and conditions text.
A quick way to create the TIFF keyboard images is to open the "Touchscreen Settings" dialog and click on the "Test keyboard..." button and select "Survey keyboard..." to display the survey keyboard. Then hold down the Shift and Ctrl keys and left click the mouse to save the keyboard images to file.
Note: The action for the "Agree" button is "OK" which accepts the user's input and displays the next survey screen if defined, or starts the photo booth shooting sequence. The action for the "Decline" button is "Close" which closes the survey screen and returns to the ready screen without taking any photos.
Example 2: Terms and conditions screen with mandatory email input and checkbox
Create a survey_keyboard.xml like the one below in the photobooth images folder:
<?xml version="1.0" encoding="UTF-8"?>
<breeze_systems_photobooth>
<photobooth_settings>
<keyboard>
<chkbox1_prompt id="terms" mandatory="1">I accept the terms and conditions</chkbox1_prompt>
<chkbox1_x>20</chkbox1_x>
<chkbox1_y>20</chkbox1_y>
<prompt1 id="email" email_address="1" mandatory="1">Please enter your email address:</prompt1>
<text1_x>20</text1_x>
<text1_y>200</text1_y>
<text1_r>1880</text1_r>
</keyboard>
</photobooth_settings>
</breeze_systems_photobooth>
After taking the photos the XML summary file will look something like this:
<?xml version="1.0" encoding="UTF-8"?>
<breeze_systems_photobooth version="3.7.1">
<photo_information>
<date>2017/06/07</date>
<time>18:13:53</time>
<user_data></user_data>
<survey_data>
<survey1_text1 id="email">sales@breezesys.com</survey1_text1>
<survey1_chkbox1 id="terms">1</survey1_chkbox1>
</survey_data>
<prints>1</prints>
<photobooth_images_folder>C:\Users\chris\Documents\PhotoboothImages\survey_example</photobooth_images_folder>
<digital_zoom>100</digital_zoom>
<mirror_output>0</mirror_output>
<camera_orientation>0</camera_orientation>
<bw_mode>0</bw_mode>
<photos>
<photo image="1">img_0006.JPG</photo>
<output>prints\170607_181353.jpg</output>
</photos>
</photo_information>
</breeze_systems_photobooth>
Example 3: Terms and conditions screen with 3 checkboxes
The first checkbox asks the user whether they are over 21 years of age.
The second checkbox asks the user to agree to the terms and conditions and is mandatory i.e. it must be selected in order to continue and take the photos.
The third checkbox asks the user whether they agree to their photos being shared on the internet.
Create a survey_keyboard.xml like the one below in the photobooth images folder:
<?xml version="1.0" encoding="UTF-8"?>
<breeze_systems_photobooth>
<photobooth_settings>
<keyboard>
<chkbox1_prompt id="over21">I am over 21 years of age</chkbox1_prompt>
<chkbox1_x>20</chkbox1_x>
<chkbox1_y>160</chkbox1_y>
<chkbox2_prompt mandatory="1" id="agree">I agree to the terms and conditions</chkbox2_prompt>
<chkbox2_x>20</chkbox2_x>
<chkbox2_y>280</chkbox2_y>
<chkbox3_prompt id="share">I agree to my photos being shared on the internet</chkbox3_prompt>
<chkbox3_x>20</chkbox3_x>
<chkbox3_y>400</chkbox3_y>
<key>
<left>20</left>
<top>20</top>
<width>320</width>
<height>120</height>
<legend>Agree</legend>
<shifted_legend>Agree</shifted_legend>
<code>OK</code>
<shifted_code>OK</shifted_code>
</key>
<key>
<left>360</left>
<top>20</top>
<width>320</width>
<height>120</height>
<legend>Decline</legend>
<shifted_legend>Decline</shifted_legend>
<code>Close</code>
<shifted_code>Close</shifted_code>
</key>
</keyboard>
</photobooth_settings>
</breeze_systems_photobooth>
You can use the results of the survey in the captions appearing on the prints by placing the appropriate token in the caption text. For example if the caption text is set to "Over 21: {survey1_chkbox1}" it will print "Over 21: 0" or "Over 21: 1" depending on whether the user checked the first checkbox or not.
Tokens can be combined e.g. if you want to print a free drinks voucher and only allow soft drinks for guests who are younger than 21 years old you could set the caption text to:
{if,{survey1_chkbox1},Free alcoholic drinks voucher,Free soft drinks voucher}
The results of the user survey can also be used to specify the download folder. For example, the download folder could be set to "public" or "private" depending on whether the user checked the third checkbox or not by setting the download folder path (in File->Preferences) to:
C:\Photos\{if,{survey1_chkbox3},public,private}
After taking the photos the XML summary file will look something like this:
<?xml version="1.0" encoding="UTF-8"?>
<breeze_systems_photobooth version="3.7.1">
<photo_information>
<date>2017/06/07</date>
<time>18:15:43</time>
<user_data></user_data>
<survey_data>
<survey1_chkbox1 id="over21">0</survey1_chkbox1>
<survey1_chkbox2 id="agree">1</survey1_chkbox2>
<survey1_chkbox3 id="share">0</survey1_chkbox3>
</survey_data>
<prints>1</prints>
<photobooth_images_folder>C:\Users\chris\Documents\PhotoboothImages\survey_example</photobooth_images_folder>
<digital_zoom>100</digital_zoom>
<mirror_output>0</mirror_output>
<camera_orientation>0</camera_orientation>
<bw_mode>0</bw_mode>
<photos>
<photo image="1">IMG_0007.JPG</photo>
<output>prints\170607_181543.jpg</output>
</photos>
</photo_information>
</breeze_systems_photobooth>
Example 4: Asking for user consent and displaying a privacy statement
This example shows how to create a simple screen asking for the user's consent to share files on a website and to display a page giving details of the event's privacy policy.
Create a file named survey_keyboard.xml containing the following text in your photo booth images folder:
<?xml version="1.0" encoding="UTF-8"?>
<breeze_systems_photobooth>
<photobooth_settings>
<keyboard>
<chkbox1_prompt id="agree to post on website">I agree to my photos being posted on a web site</chkbox1_prompt>
<chkbox1_x>30</chkbox1_x>
<chkbox1_y>30</chkbox1_y>
<key>
<left>20</left>
<top>120</top>
<width>320</width>
<height>120</height>
<legend>Continue</legend>
<shifted_legend>Continue</shifted_legend>
<code>OK</code>
<shifted_code>OK</shifted_code>
</key>
<key>
<left>360</left>
<top>120</top>
<width>320</width>
<height>120</height>
<legend>Cancel</legend>
<shifted_legend>Cancel</shifted_legend>
<code>Close</code>
<shifted_code>Close</shifted_code>
</key>
<key>
<left>900</left>
<top>120</top>
<width>320</width>
<height>120</height>
<legend>Privacy info...</legend>
<shifted_legend>Info</shifted_legend>
<code>Info</code>
<shifted_code>Privacy info...</shifted_code>
</key>
<key>
<left>20</left>
<top>120</top>
<width>320</width>
<height>120</height>
<legend>Info close</legend>
<shifted_legend>Info close</shifted_legend>
<code>Info close</code>
<shifted_code>Info close</shifted_code>
</key>
</keyboard>
</photobooth_settings>
</breeze_systems_photobooth>
Then create a JPEG screen image the same size as the computer's display and save it in your photo booth images folder as survey_keyboard_info.jpg. Edit the survey_keyboard_info.jpg image to show the required information (e.g. the event's privacy policy) and the graphics for a close button to line up with the "info close" key in the XML file i.e. 320 pixels wide by 120 pixels high, placed 20 pixels from the left and 120 pixels from the top of the screen.
Explanation:
The lines starting <chkbox1 define the position of the checkbox and the text prompt displayed to the user.
The first <key> defines the position of the OK key which has the legend "Continue". When this is tapped the survey screen closes and the photo booth shooting sequence continues.
The second <key> defines the position of the close key which has the legend "Cancel". When this is tapped the survey screen closes and the booth returns to the ready screen without taking any photos.
The third <key> defines the position of the info key with the legend "Privacy info...". When this is tapped the survey_keyboard_info.jpg image is displayed. This is displayed until the 30 second timeout occurs or the user taps the info close button.
The fourth <key> defines the size and position of the info close button. When this is tapped the info screen is closed and control is returned to the survey keyboard. Please note that this key is not displayed in the keyboard or the info screen. All it does is define the position of the area the user should tap to close the info screen. If you wish to show this key in the info screen you need to edit the survey_keyboard_info.jpg screen image.
The user's response is stored in the photo booth XML summary file. It can also be used in captions that appear on prints or in the filenames and folder path of downloaded images using the token {survey1_chkbox1}. This returns 1 if the checkbox is selected or 0 if it is not selected.
For example the photos could be automatically saved to a folder named "website" if the users checks the checkbox and to a folder named "no website" by setting the download folder in File->Preferences to:
{documents}\PhotoboothImages\{dateLess8h} {if,{survey1_chkbox1},website,no website}
Making survey data available to other applications
The survey data is recorded in the photo booth summary XML file but it can also be written to the Windows registry when the survey keyboard closes to make it available to other applications.
To enable this set the following Windows registry value to 1:
HKEY_CURRENT_USER\SOFTWARE\BreezeSystems\DSLRRemotePro\100\WriteSurveyDataToRegistry
When the user has completed the survey their responses are saved as a JSON string in the following Windows registry value:
HKEY_CURRENT_USER\SOFTWARE\BreezeSystems\Event Info\SurveyData
e.g. a survey screen which has a checkbox asking for their email address and whether the they give consent for the photos to be added to a gallery would result in the following JSON string being written to the registry:
{"dateTime":"20221028_114152","surveyData":[{"id":"email","key":"survey1_text1","value":"sales@breezesys.com"},{"id":"agree","key":"survey1_chkbox1","value":"1"}]}
dateTime is the date and time the survey was displayed in the for YYYYMMDD_hhmmss
surveyData is an array of responses in the form id, key and value. id is the identifier assigned to the input, key contains the survey screen and input type and value is the user's response.