Secure single use QR codes provide an extension of the QR codes used for contactless operation. The QR code is signed using a password to make it secure and difficult to forge and can only be used once on a given computer. This means that it can be used for theme parks and attractions or for photo booths where users can be issued with a QR code "coupon" to use the photo booth. It can also be used to run a paid photo booth where the user makes a payment using an online payment service such as PayPal and is sent an email or a text linking to a single use QR code that can be scanned by the photo booth.
Enabling Secure Single Use QR Codes
Enable the scanning of QR commands and strings in the "Photobooth Settings" for each event.
To only allow the use of secure QR codes and ignore all other QR codes select File->Single use QR codes and then check the "Only accept single use QR codes" checkbox:
Generating Single Use QR Codes
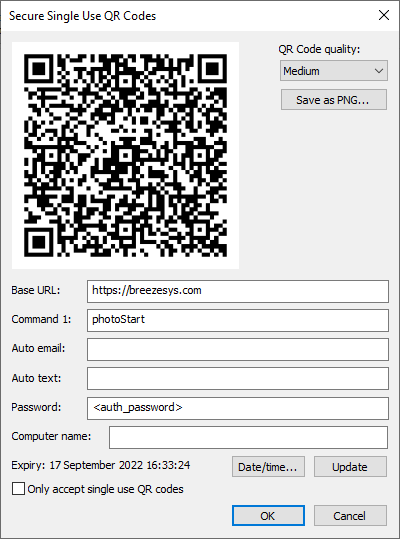
Select File->Single use QR codes to display the "Secure Single Use QR Codes" dialog (shown above). The current QR code is displayed at the top of the dialog. This is updated automatically as the various settings are changed. The QR code can be saved as a PNG image by pressing the "Save as PNG..." button. The "QR Code quality" dropdown list controls the quality of the QR code. The higher quality settings give denser QR codes with the QR text encoded multiple times to increase the chances of the QR code being scanned even if areas are damaged or obscured. Choose a higher quality setting if you plan to place a logo over part of the QR code.
The "Base URL" setting can be set to any URL. If the QR code is scanned using a mobile phone it will normally open a web browser and load that URL. Change this URL to point to your web site or to the web site for the event to direct users to that site if they scan the QR code using their phones.
Set "Command 1" to the touchscreen command to be executed when the QR code is scanned by the photo booth. Any touchscreen command can be used, but normally this would be a command to start the photo booth countdown e.g. "photoStart". A list of available touchscreen commands can be found in the "Touchscreen editor". The touchscreen command does not need to be defined in the ready screen for it to work - in fact it is best not to define it otherwise users could start the photo booth by tapping the screen instead of scanning the QR code. When checking the scanned command spaces and punctuation marks are ignored as upper or lower case e.g. the touchscreen command "Select profile 1 + start" can called by setting "Command 1" to "selectProfile1Start" or "Select profile 1 + start".
To automatically send an email after taking the photos enter the email address in the "Auto email" field. This option is included in the dialog for testing purposes only. Normally you would use an online QR code generator to create a QR code with a user's email address if you want to automatically email the photos.
The "Auto text" field works in a similar way but is used to send a text message after taking the photos.
The password field provides a way of making the QR code more secure. A scanned QR code will be rejected if the password does not match the password entered in the the "Secure Single Use QR Codes" dialog.
The "Computer name" field provides a way of limiting a QR code to a particular computer. A scanned QR code will be rejected if the computer name in the QR code does not match the name of the computer running the photo booth. Leave this fieid empty to disable this option.
Single use QR codes generated using the "Secure Single Use QR Codes" dialog have an expiry time and date. A scanned QR code will be rejected if it is scanned after the expiry time. Click on the "Date/time..." button to set the expiry time.
Providing Feedback When Scanning QR Codes
If a QR code is scanned and accepted the app will execute the commands (e.g. starting the countdown) without displaying any additional information. If there is an error a simple error message screen will be displayed for a few seconds. This can be customized by providing an optional PNG screen image.
The error message will be displayed in English unless a PNG screen image is provided.
The following error screens filenames can be used:
qr_missing_parameters.png - the QR code is missing the auth or j parameters
qr_not_authorized.png - the auth parameter does not match the SHA1 hash of the JSON string plus password or the optional id in the JSON string does not match the computer's name
qr_invalid.png - the JSON string cannot be decoded
qr_used.png - the QR code has already been used on this computer
qr_expired.png - the QR code has expired
QR Code Text Technical Details
The QR code is in the form of a URL which has two parameters: a JSON string containing the commands and a SHA1 signature.
The JSON string can contain up to 10 strings (s1 to s10) and up to 10 commands which correspond to touchscreen actions (c1 to c10). It can also contain an email command (autoemail or email) and an expiry date and time. Please see QR codes used for contactless operation for information about the strings, commands and email options.
The expiry date/time is in the form of the number of seconds since the Unix epoch (00:00:00 UTC on 1 January 1970) stored in the JSON "expiry" value.
For additional security an optional id field can be added to the JSON string to specify the computer name. The app will only process the QR code if the id in the JSON string matches the name of the computer.
The signature is the SHA1 hash of the JSON string plus the password.
Example:
To create a QR code that starts a photo session with the touchscreen command "photoStart"and automatically emails the output to sales@breezesys.com and is valid until 12:57 on Tuesday, May 19th, 2020 the JSON string would be:
{"c1":"startPhotobooth","autoemail":"sales@breezesys.co","expiry":1663430400}
The default password for the app is: <auth_password>
The string to sign is the JSON string + the password: {"c1":"startPhotobooth","autoemail":"sales@breezesys.co","expiry":1663430400}<auth_password>
The SHA1 hash of the string to sign is: a48db8d2b2900cb38bf155d5c1c14925b2a43d4f
The text for the QR code needs to be in the form of a URL with a base URL which can be anything you like e.g. https://breezesys.com
The signature is then added as the 'auth' parameter e.g. https://breezesys.com?auth=a48db8d2b2900cb38bf155d5c1c14925b2a43d4f
Then URL encode the JSON string and add it to the URL as the "j" parameter e.g.
https://breezesys.com?auth=a48db8d2b2900cb38bf155d5c1c14925b2a43d4f&j=%7B%22c1%22%3A%22startPhotobooth%22%2C%22autoemail%22%3A%22sales%40breezesys%2Ecom%22%2C%22expiry%22%3A1663430400%7D
Additional parameters can also be added to the base URL if required. One use for this would be to provide a link to the photos on an online gallery e.g. https://yoursite.com/gallery.php?id=1234&auth=...
Example PHP Script
The PHP code below will generate the QR code text to start a photo booth session using the touchscreen command "photoStart" and automatically email the photos to sales@breezesys.com. The QR code will be valid for 5 minutes (300 seconds) from when it was generated:
// add touchscreen command to switch to stills mode and start the countdown
$json['c1'] = "photoStart";
// add a command to automatically email the photos to sales@breezesys.com
$json['autoemail'] = "sales@breezesys.com";
// set the expiry time to 300 seconds from now
$expires = time() + 300;
$json['expiry'] = $expires;
// generate the JSON string and SHA1 signature
$jsonStr = json_encode($json);
$authStr = $jsonStr . "<auth_password>";
$auth = sha1($authStr);
// construct the URL for the QR code text
$url = "https://breezesys.com?auth=$auth&j=" . urlencode($jsonStr);