QR codes can be displayed on prints and in the sharing screen to provide a quick way for guests to visit your website or online gallery simply by scanning the QR code with their phone. QR codes can also be used for sending commands to the photo booth together with information such as email addresses. This makes it possible to run a contactless photo booth where users can select the session type (e.g. photos or boomerang GIFs) and send emails without having to touch the photo booth.
QR codes can be generated on a user's phone and used to run the photo booth and send emails without the user having to touch the photo booth. Please see this video for a summary of what's possible: https://vimeo.com/414822646
DSLR Remote Pro can read QR codes from the camera's live view or by using a webcam and the Webcam QR Code Scanner utility. The QR codes can be used to trigger any touchscreen action defined for the event and to enter email addresses for sending the output directly to the user.
The QR codes can be created using the QR code generator on the website contactlessbooth.com. Please see this page for information customizing the QR code generator.
Alternatively you can create a QR code generator on your own website using Wordpress plug-ins or scripts such as this sample PHP script.
Quickstart Guide
| 1. | Select a suitable camera For best results use a Canon camera which has dual pixel autofocus and set this to continuous AF and face detect. Suitable cameras include: Canon EOS M50, Canon REBEL SL2/EOS 200D, Canon Rebel SL3/EOS 250D, Canon EOS 77D, Canon Rebel T7i/EOS 800D If you don't have a suitable camera you can use a webcam and the Webcam QR Code Scanner utility instead |
| 2. | Setup the event Please make sure your event has touchscreen actions defined for "Select photobooth+start" and "Select video booth+start". Enable "Scan QR codes for commands" in the "Photobooth Settings" dialog to enable the scanning of QR codes to run photo booth commands. Enable the email sharing option and setup the email server settings. |
| 3. | Run the photo booth and start scanning QR codes Visit contactlessbooth.com using the web browser on your phone (or scan the QR code below using your phone's camera), enter your email address and choose the session type and then hold your phone in front of the photo booth's camera so that it can scan the QR code. If everything is setup correctly the photo booth will start the countdown, take the photos and then automatically email them when it displays the sharing screen. |
Resources
| • | For more information please see the section on Scanning QR Codes below |
| • | To use a webcam to scan the QR codes see Webcam QR Code Scanner |
| • | For notes on customizing the QR code generator, hosting your own QR code generator etc. please visit https://contactlessbooth.com/qr |
QR codes can be provide a quick and convenient way for users to view their photos in an online gallery or website simply by scanning the QR code with their phone. Dynamically generated QR codes can be displayed on prints and in the sharing screen. If you use a microsite system that displays photos using UIDs (e.g. Photobooth Gallery Plugin for Wordpress) the QR code can be used to jump straight to the user's photos.
QR codes can be displayed on prints by adding a QR code in the print layout editor. A QR code can also be displayed in the sharing screen by selecting the "Display QR code" option in the "Output Settings" screen where the email and other sharing settings are specified. The size and position of the QR code displayed in the sharing screen can be adjusted using the touchscreen editor.
The QR code text can be edited by selecting "Edit QR code..." from the File menu. The QR code text can be dynamically generated to include a photo's filename or UID by using tokens. Please see the Editing QR Codes section in the Print Layout Editor for details.
DSLR Remote Pro is able to scan QR codes in photo booth mode when the camera's live view is enabled. QR codes can be used to scan in information such as names, unique ids or email addresses. QR codes can also be used to scan in commands to control the photo booth e.g. select a profile and start the countdown.
QR codes should be defined as URLs with the commands and strings defined as percent encoded parameters. The URL parameters can be made up of strings only, commands only or a mixture of both.
Scanning strings
Up to 10 strings can be defined in the URL by naming the parameters s1, s2, s3 etc. The URL below gives and example with s1 set to "John" and s2 set to "Doe":
https://example.com?s1=John&s2=Doe
These strings can be accessed using tokens e.g. {qr1} for s1, {qr2} for s2 etc. One way to use these tokens is in captions added to print layouts e.g. to print the name scanned from QR code on the print the caption text could be set to "Name: {qr1} {qr2}".
The parameters should be percent encoded e.g. to define a single parameter that includes two words separated by a space the space is encoded as %20 e.g.
https://example.com?s1=John%20Doe
If you are using the photo booth as a data capture device which prints a QR code you can use the {urlencode,str} token to percent encode the responses e.g. if the user enters their name in survey screen 1 in a text field with id "name" this can be percent encoded and included in the QR code text as:
https://example.com?s1={urlencode,{survey1_text1}}
The QR tokens are cleared after each shooting session.
Scanning commands
Up to 5 commands can be defined in the URL by naming the parameters c1, c2, c3 etc. The values of the commands should be the same as the names of the touchscreen commands displayed in the touchscreen editor.
e.g. selectPhotobooth+start or selectProfile1.
The URL below gives and example with c1 set to "selectProfile1" and c2 set to "selectPhotobooth+start". This will tell the photo booth to select profile 1 and then switch to stills mode and start the countdown:
https://example.com?c1=selectProfile1&c2=selectPhotobooth%2bstart
Please note: a command scanned in from a QR code will only be executed by the app if there is a corresponding touchscreen keyboard action defined e.g. the command c1=selectProfile1 will only be executed if there is a touchscreen action for selectProfile1.
The app ignores upper and lower case, spaces and punctuation when comparing the command string with the touchscreen actions e.g. the following strings will all match the touchscreen action "Select photobooth+start":
c1=Select%20photobooth%2dstart
c1=select%20photobooth%2dstart
c1=selectphotobooth%2dstart
c1=selectphotoboothstart
The %20 and %2d above are to represent the space and plus characters. This is because parameters added to URLs need to be urlencoded. For simplicity you can omit spaces and punctuation from the commands e.g. use selectphotoboothstart instead of
Select%20photobooth%2dstart.
Scanning email addresses
Email addresses can be scanned in from the sharing screen to send an email to a single email address with one or more optional CC email addresses. The parameters for email addresses are:
email - only sends an email if the QR code is scanned when the sharing screen is displayed
autoemail - automatically send the email when the sharing screen is displayed if the QR code is scanned when the ready screen is displayed e.g. read the email address, start the countdown and automatically send the email when the sharing screen is displayed.
cc - a CC email address
Scanning phone numbers for texting
Phone numbers can be scanned in from the sharing screen to send a text message. The parameters for texting phone numbers are:
text - only sends a text if the QR code is scanned when the sharing screen is displayed
autotext - automatically send the text when the sharing screen is displayed if the QR code is scanned when the ready screen is displayed e.g. read the phone number, start the countdown and automatically send the text when the sharing screen is displayed.
Scanning the event name and event strings
The event name and event strings can be scanned in from any screen that supports QR code scanning:
en - the event name
es1 - event string 1
es2 - event string 2
es3 - event string 3
es4 - event string 4
es5 - event string 5
Please see the section headed Event Info for more information on event strings.
Examples
Example 1: Send an email to techsupport@breezesys.com and CC it to sales@breezesys.com when the QR code is scanned when the sharing screen is displayed:
https://breezesys.com/qr.php?email=techsupport%40breezesys.com&cc=sales%40breezesys.com
Example 2: Switch to photo mode, start the countdown and automatically send an email to sales@breezesys.com when the sharing screen is displayed:
https://breezesys.com/qr.php?c1=Select+photobooth%2Bstart&autoemail=sales%40breezesys.com
Example 3: Set the token {qr1} to string to identify the guest (e.g. ABCDE123) then switch to photo mode, start the countdown and automatically send an email to sales@breezesys.com when the sharing screen is displayed:
https://breezesys.com/qr.php?s1=ABCDE123&c1=Select+photobooth%2Bstart&autoemail=sales%40breezesys.com
When a QR code that doesn't contain commands is scanned in the ready screen visual confirmation can be provided by displaying the optional ready_overlay_qr.png screen (or video_ready_qr.png screen when scanning a QR code in the video ready screen).
Sometimes it is useful to repeat the most recently scanned QR code using a touchscreen action. This can be done by defining a qrRepeat touchscreen action in the ready or video ready screens. For privacy reasons the most recently scanned QR code is only available to be repeated for 5 minutes after which time it is discarded.
Scanning QR codes using the camera vs a webcam
QR codes can be scanned using the camera's live view or using the "Webcam QR Code Scanner" utility with a webcam.
The scanning of strings from QR codes using the camera's live view display is enabled using the "Scan QR codes for strings" setting in the Photobooth Settings dialog and the scanning of commands is enabled using the "Scan QR codes for commands" setting.
Please note that when using the camera's live view display to scan QR codes the QR codes can only be scanned when live view is active e.g. in the ready screens and the sharing screen but not in the standby screen. When using the camera's live view display to scan QR codes a camera with dual pixel AF set to continuous AF and face detect or wide area AF will give the best results.
The Webcam QR Code Scanner which allows a webcam to be used to scan QR codes for the photo booth. It can display a live feed from the webcam on the screen to help people position their phone when scanning a QR code. You can specify the size and position of the live feed and when it is displayed using the app's settings.
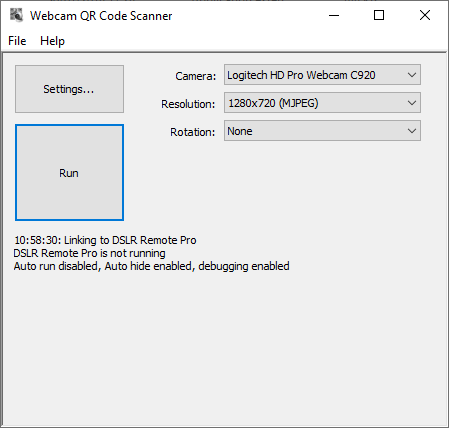
Select the webcam from the "Camera:" dropdown list and then set the resolution and rotation as required. The resolution does not need to be set to the highest setting to scan QR codes successfully. A lower resolution setting should work well and may provide a faster live view refresh rate.
Click on the "Settings..." button to adjust the settings:
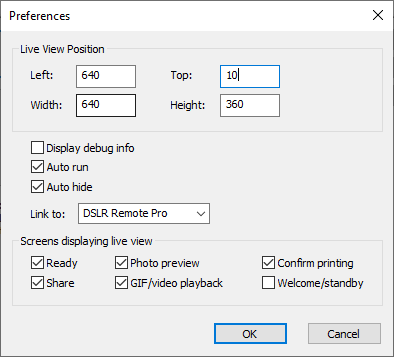
Use the left, top, width and height settings to specify the size and position of the live view window on the screen.
Select "Display debug info" to display debug info in the live view window. This includes the size and position of the live view window and the text scanned in from QR codes.
When debug info is selected you can adjust the position of the live view window by dragging it with the mouse.
Select the "Auto run" option to start displaying the live view window automatically when the photo booth runs in full screen mode.
Select the "Auto hide" option then use the "Screens displaying live view" options to specify when the live view window should be displayed.
Set "Link to:" to DSLR Remote Pro to use the Webcam QR Code Scanner utility with a photo booth run by DSLR Remote Pro.
Sending Commands from other Apps
The Webcam QR Code Scanner utility passes the scanned URL to DSLR Remote Pro by sending a WM_COPYDATA message with the data type (dwData) set to 200. Other apps can also use this technique to send commands to control the photo booth. Please note that the command string must be in the form of a URL and can only execute commands that correspond to touchscreen actions defined for the event.
Please see "Controlling the Photo Booth" for more information.