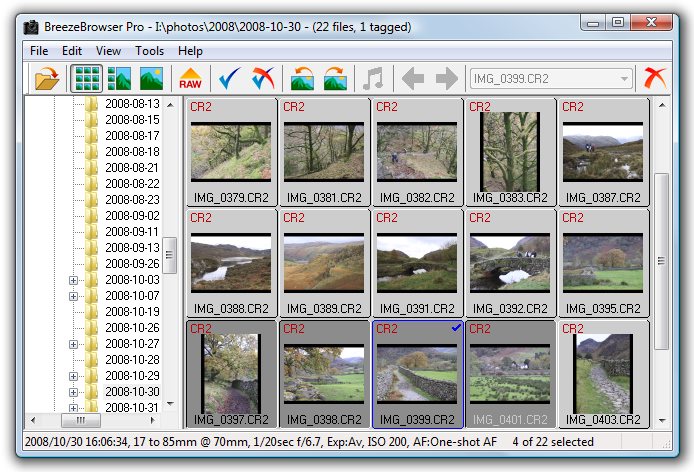
The Thumbnail View shows the thumbnails of all the images in the directory. The background color for the thumbnail window and the size of the thumbnails can be set using the preferences settings dialog. Select a single image by clicking on it, a range of images by clicking on the first image and then click on the last image while holding the SHIFT key down. Individual images can be added to or removed from the selection by clicking on them with the CTRL key held down. Selected images are highlighted as shown in the screenshot above where images IMG_0397 through to IMG_401 are selected.
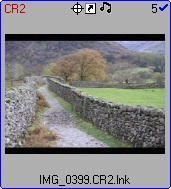
The thumbnail above shows all the various captions and icons that can be displayed. The filename of the image is displayed and the bottom and its file extension is displayed in the top left hand corner. Images shot in raw+JPEG mode will have a raw+JPEG icon displayed in the top left corner instead of the file extension. At the top in the middle is GPS icon showing that the image contains GPS latitude and longitude data, the shortcut icon indicating this is a shortcut to a file (see Shortcuts/links to files for more details) and the musical note icon indicating that this image has a sound annotation file associated with it (press on the musical note button in the toolbar or right click and select "Play sound annotation" to play the sound file). In the top right hand corner is the number "5" indicating that this image has a ranking of 5 (see Image Ranking for more details) and a blue tick indicating that this image has been tagged (see Tagging for more details).
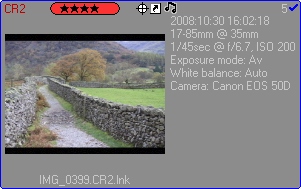
Thumbnails can also be shown with shooting data as in the thumbnail above. The thumbnail shooting data display can be edited by selecting "Thumbnail Shooting Data..." from the View menu and the dialog below will be displayed:
The display of shooting data with thumbnails can be enabled by selecting the "Display shooting data with thumbnails" checkbox. It can also be toggled on and off from the thumbnail view in the main window using the keyboard shortcut: Ctrl+Alt+C.
When the "Display Adobe Ratings and Labels" checkbox is selected BreezeBrowser Pro will read the rating and label information from the XMP shooting data associated with the image and display it above the thumbnail. Click on the "Settings..." button to edit the label names associated with each color:
The size of the area for displaying the shooting data to the right of the thumbnail can be specified using the "Caption width in pixels" setting.
The caption format string specifies what information is displayed with the thumbnail. This format string uses the same tokens to specify the settings to be displayed as the HTML generator (see HTML Generation) and these are expanded to show the values of the actual data from the image e.g. @model@ in the format string is expanded to show "Canon EOS 50D" in the thumbnail example above.
The display of the GPS icon can also be turned on or off using this dialog.
Please Note: The thumbnail shooting data and GPS icon display may result in the thumbnail display taking slightly longer to display than when these options are turned off. This is because BreezeBrowser Pro has to read the shooting data for each thumbnail before it is displayed. The shooting data display may not be automatically updated when an image is modified. Please press F5 to refresh the display if this happens.
In thumbnail mode most actions apply to the selected images e.g. rotate, delete, HTML, proofs. Some actions only apply to one image e.g. rename image. Actions applying to a single image are performed on the image which has focus. Focus is set when you click on an image and the focused image is displayed with a different text color. The focused image in the screenshot is IMG_401 and a summary of its EXIF data is displayed in the status line at the bottom of the window.
Each thumbnail shows the image with the image filename underneath and the image type (the same as its file extension) in the top left hand corner. Long filenames may be truncated to fit in the available space and will have "..." appended to them e.g. "a_very_long_name.jpg" might be displayed as "a_very_long...". The image type is color coded to make it easier to identify the different types. JPEGs are displayed in blue, Canon raw files in red, AVI files in green and all other types are displayed in black.
If the image has been tagged a blue tick will be displayed in the top right hand corner. In the screenshot above image CRW_0179 is tagged.
Double-click on an image to switch to the Main View with the image displayed.
You can also change the display using one of the following keyboard shortcuts:
| • | Ctrl+M - switch to main view |
| • | Escape - switch to main view or thumbnail view depending on the double-click options set in preferences |
| • | Shift+Escape - switch to filmstrip view |
| • | Ctrl+X - display extra large thumbnails |
| • | Ctrl+L - display large thumbnails |
| • | Ctrl+T - display small thumbnails |
Right click on an image to display a menu of the operations that can be performed on the selected image or images:
| 1. | Main View - switch from Thumbnail View to Main View |
| 2. | Tag Image - add or remove the tag on the focused image |
| 3. | Play Sound - play the sound annotation file associated with the image (only displayed if the image has a corresponding WAV file) |
| 4. | Play Video - play the video clip using the default Windows viewer (only displayed for AVI files) |
| 5. | View Actual Image - display the image under the mouse cursor full size in a separate window |
| 6. | Edit Image - edit the image under the mouse cursor in the editor specified in your preference settings |
| 7. | Slideshow - display the currently selected images in the slideshow window |
| 8. | Extract embedded JPEGs - extracts embedded JPEGs from raw files |
| 9. | Proofs - display the proofs dialog. When you press the 'Proof All' button only the currently selected images will be proofed |
| 10. | HTML - display the HTML page generation dialog. When you press the 'Generate HTML' button HTML pages will only be generated for the currently selected images |
| 11. | Rotate Left (CCW) - rotate the selected images 90 degrees counter-clockwise |
| 12. | Rotate Right (CW) - rotate the selected images 90 degrees clockwise |
| 13. | Edit Comments - display the 'Edit Comments' dialog for the image. If you press the 'Apply to All' button the comments will be added to the currently selected images |
| 14. | Edit IPTC Data - add or edit IPTC data in the focused image (see IPTC Data) |
| 15. | Rename the focused image |
| 16. | Batch rename the selected images |
| 17. | Move To Folder - move the selected images to a new directory |
| 18. | Email Images - email one or more images with the option to resize them for easy viewing on a PC screen and to reduce file size |
| 19. | Delete - delete the selected images by moving them to the Windows Recycle Bin or the 'Deleted' sub-directory according to your preferences settings |
NOTES:
| 1. | If an image file has become corrupted the thumbnail will be displayed as a red cross. |
| 2. | Extra large thumbnails use a lot of memory and can affect system performance on machines with limited RAM. BreezeBrowser Pro can handle directories with very large numbers of images and has been tested with a directory containing 2500 raw files and 1500 JPEGs |
| 3. | To email images the default email client installed on the computer must be a 32-bit app that is MAPI compliant e.g. Mozilla Thunderbird or 32-bit versions of Microsoft Outlook. |