First use the Print Setup dialog to select the printer, paper size and orientation. Then use the Page Setup dialog (shown below) to control how images are printed. The units for the various measurements will be shown in mm or inches depending on your computer settings.
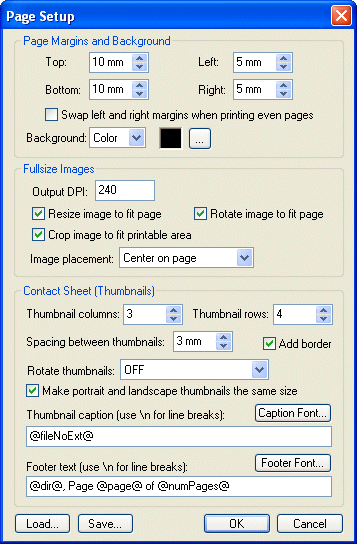
The page margins section defines the size of the printing area on the page for both contact sheet printing and for printing full size images. To use the full printing area available set the margins to 0. Set the left margin to a larger value (e.g. 15mm) if you intend to punch holes in the paper to store it in a ring binder.
Most printers cannot print right to the edge of the paper and when the page margins are outside the printing area BreezeBrowser Pro will adjust them to fit automatically.
The "Swap left and right margins when printing even pages" option is useful when printing on double sided paper with a duplex printer when you want have a larger margin on one side of the page for binding e.g. If the left margin is set to 25mm and the right margin is set to 5mm the first page will have a 25mm left margin, the second page will have a 5mm margin etc.
Use the "Background" dropdown list to specify the page background. The default setting is "None". When the background is set to "Color" the page will be filled with the selected color. Click on the "..." button to select a different color. The background can also be set to a background image. The background image is assumed to be 240dpi (i.e. a 240x240 pixel image will be output as a 1 inch square) and is tiled to fill the page.
Please note: The default color for the caption and footer text is black. If you select a dark background for the page you may need to change the text color for it to be visible. To do this click on the "Caption Font..." or "Footer Font..." button and select a new text color.