Select a suitable image in main view or thumbnail mode and either right click on the image and select "Edit IPTC/XMP Data..." from the menu or select the "Edit IPTC/XMP Data..." option from the Edit menu. These options will be grayed out if the image doesn't support IPTC data.
The IPTC Data dialog is divided up into six different sections: Description, Keywords, Categories, Contact, Origin and Image. Click on the tabs along the top of the dialog to select the required section.
Tokens can be used to insert information from the image properties and shooting data e.g. use @time@ to insert the time the image was taken, @iso@ for the ISO setting, @model@ for the camera model name. This is particularly useful if you need to add information from the shooting data to a batch of images. The tokens are the same as used for HTML generation. Press the "Show tokens..." to display a list of tokens and their values.
Note: Please don't use the tokens for IPTC data (e.g. @IPTC_caption@) as you may get unexpected results.
The "Load..." and "Merge..." buttons displayed under the image thumbnail can be used to load previously saved IPTC data. Load will load all the saved data and overwrite the existing data whereas Merge will only fill in empty fields in the IPTC dialog. The "Save..." button can be used to save IPTC data to file for future use.
Pressing the "< Prev" or "Next >" buttons will save the IPTC data for the current image and display the previous or next image. You may also use the keyboard shortcuts Ctrl+[ or PageUp to move to the previous image and Ctrl+] or PageDown to move to the next image.
A larger preview image can be displayed by clicking the mouse on the thumbnail image (click the mouse in the window or use the close button in the top right hand corner to close the preview window).
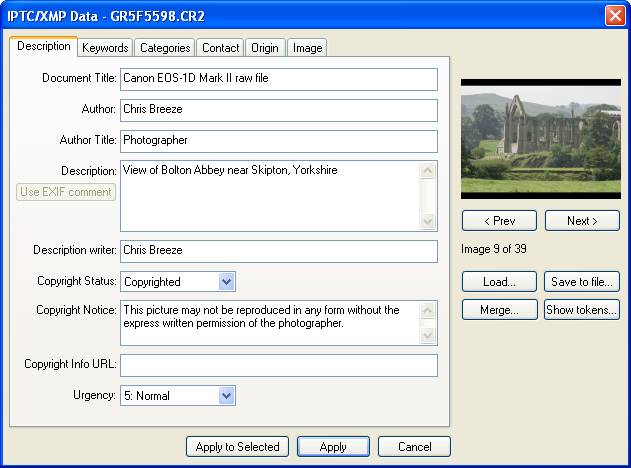
All the data fields under the Description tab are free text entries. The urgency is a number from 0, meaning "None", through 1 (meaning "High") to 8 (meaning "Low").
The "Use EXIF comment" button can be used to copy the EXIF user comment to the description. If the image does not contain an EXIF comment this button will be grayed out.
Note: If IPTC captions are selected in preference to EXIF comments the IPTC description will be shown in the comment display when viewing images.
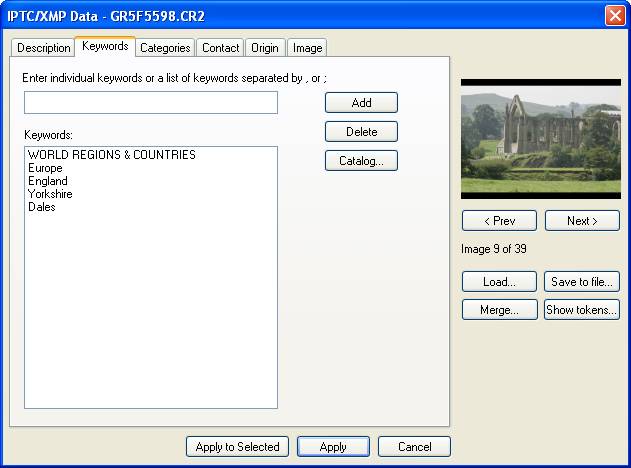
Click on the Keywords tab to display the keywords. The keywords are displayed in the order they were entered (as opposed to alphabetical order) and each keyword must be unique and no more than 64 characters in length. To add a new keyword enter the keyword in the text edit area at the top and either press the Enter key or the Add button. To delete keywords first select them from the list then press the Delete button.
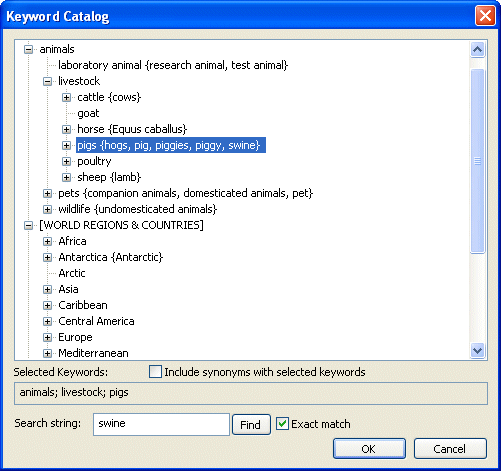
Press the "Catalog..." button to display a list of pre-defined keywords in the dialog below:
The keyword catalog is read from a simple tab delimited file called keywords.txt in the BreezeBrowser Pro installation folder (if keywords.txt can't be found BreezeBrowser Pro will try to load sample_keywords.txt instead). The sample_keywords.txt file included with BreezeBrowser Pro is a small extract from the controlled vocabulary created by David Riecks. Please visit http://www.controlledvocabulary.com for details of the considerable benefits of using a controlled vocabulary for keywords and to purchase the full keyword controlled vocabulary file.
Another source of keywords is the Hierarchical Keyword Catalog from Tim Makins at http://www.photo-keywords.com. His keyword-catalog is carefully organized in an easy-to-use logical structure designed so users can quickly 'drill down' through the hierarchical list to find not only the keywords they are looking for, but also similar keywords to expand the definition, and associated words to more fully describe the scene.
One other source is the Keyword Catalog written by Shangara Singh and available from http://www.keyword-catalog.com It covers a broad sweep of subjects, divided into 40 convenient main categories, subcategories, headings and subheadings. You can load all of the categories or on a need-to-use basis in order to streamline the navigation. The full version contains over 30,000 keywords but you can pick-and-mix and purchase only the subjects that interest you.
Keywords can be selected by browsing the keyword tree or by entering a search string and pressing the Find button. Then press the OK button or double click on the item in the tree to copy the selected keywords to the IPTC/XMP keyword dialog.
Synonyms are shown in braces/curly brackets after the keyword and are included when searching. Synonyms are only copied to the "Selected Keywords" with the main keyword when "Include synonyms with selected keywords" is selected.
In the screenshot above the user has searched for "swine" which is a synonym for "pigs" along with the synonyms "hogs", "pig", "piggies" and "piggy".
Items enclosed in square brackets are headings to help organize the keywords and are not copied to the "Selected Keywords" when you click on them.
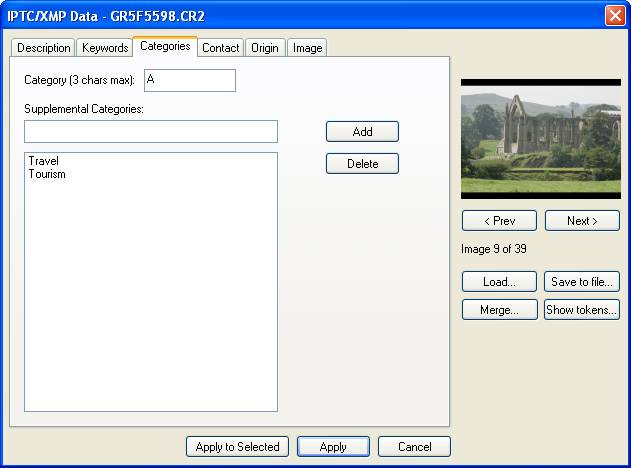
Click on the Categories tab to display categories. The main category is a free text entry. The supplemental categories are displayed in the order they were entered (as opposed to alphabetical order) and each one must be unique. To add a new supplemental category enter it in the text edit area at the top and either press the Enter key or the Add button. To delete a supplemental category first select it from the list then press the Delete button.
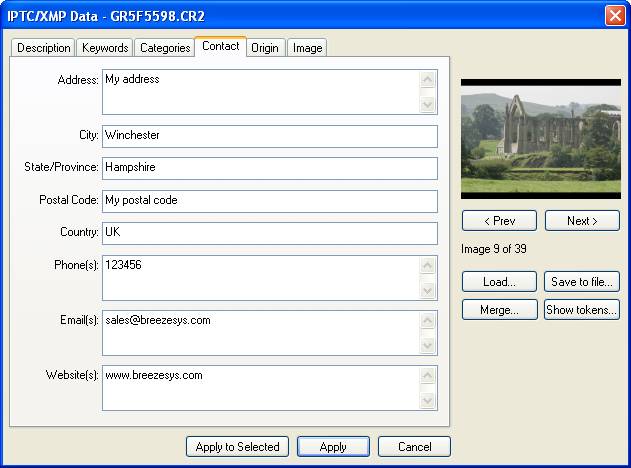
All the data fields under the Contact tab except for priority are free text entries and normally contact information for the photographer.
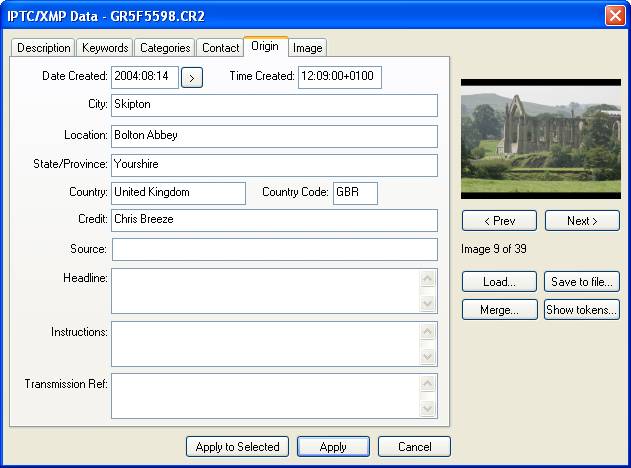
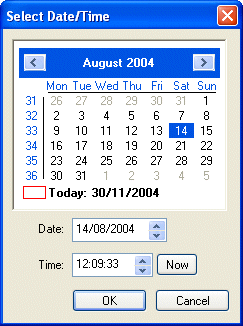
All the data fields under the Origin tab are free text entries except for the "Date Created" field. This must contain a date in the form YYYYMMDD where YYYY is the year including century (e.g. 2006), MM is the month (e.g. 03 for March) and DD is the day (e.g. 26). An optional : or / character may also be used to separate the year, month and date. Press the ">" button after "Date Created" to display a menu to set the date/time to the EXIF shooting date, the file creation date, the current time, yesterday, two days ago or select any date using the date/time dialog (shown below).
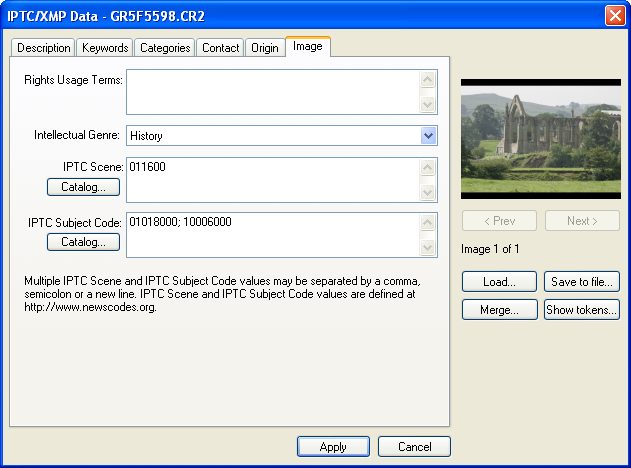
The rights usage field is a free text entry field and is normally used to enter further information about the image and how it may be used. The intellectual genre field specifies the genre of the image using the list of genres defined by the IPTC. The IPTC scene and subject code fields should contain a list of numeric IPTC scene and subject code values classifying the image. These values use a controlled vocabulary defined by the IPTC to standardize their usage. Click on the "Catalog..." button to display the dialog below to select the codes:
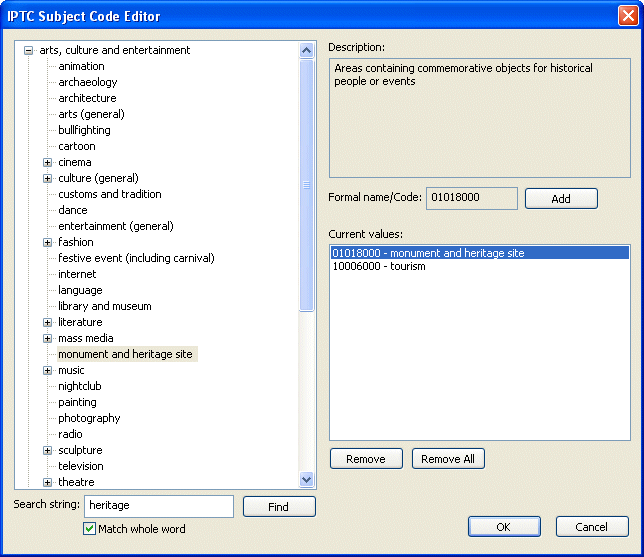
The IPTC subject code editor is shown above. On the left is a list of subject codes which can be expanded by clicking on the + and - buttons. When you click on an item in the list its formal name or code is displayed on the right together with a description of the item. The current values for the image are displayed on the right and this list can be added to by pressing the "Add" button or by selecting an item from the list on the left and pressing return. Items can be deleted by selecting the item from the list on the right and pressing the "Remove" button or the delete key.
You can search for whole or partial words in the name or explanation by entering a search string in the bottom left and clicking on the "Find" button.
The scene editor is very similar in appearance but only has a single level list of names on the left hand side.
The values displayed in this dialog (and in the intellectual genre list in the IPTC editor Image section above) are read from XML news code topicset files supplied by the IPTC. These are stored in the topicset folder where BreezeBrowser Pro is installed (usually C:\Program Files\BreezeSys\BreezeBrowserPro\topicset). The files are named as follows: topicset.iptc-genre.xml, topicset.iptc-scene.xml and topicset.iptc-subjectcode.xml. At the time of writing the IPTC have translated topicset.iptc-genre.xml into Spanish ( topicset.iptc-genre_es.xml) and topicset.iptc-subjectcode.xml into German (topicset.iptc-subjectcode_de.xml), Spanish (topicset.iptc-subjectcode_es.xml) and French (topicset.iptc-subjectcode_fr.xml). The translated files can be used in BreezeBrowser Pro's IPTC subject code editor by downloading the relevant file from http://newscodes.org and renaming it e.g. to use the French translation of the subject codes download topicset.iptc-subjectcode_fr.xml from http://newscodes.org, rename it to topicset.iptc-subjectcode.xml and copy it into BreezeBrowser Pro's topicset folder.
The copyright of the XML topicset files belongs to the IPTC and are included with BreezeBrowser Pro with the IPTC's permission.