Click on "Create Event..." to create an event using one of the preset themes:
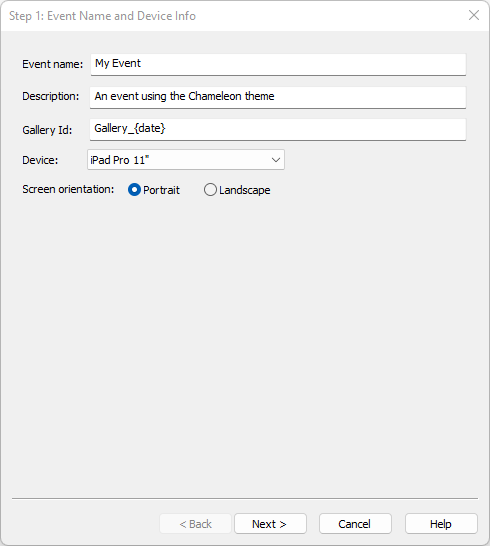
Enter the name of the new event and an optional description.
Enter an optional gallery id to identify the gallery when using Event Kite online galleries and micro-sites. The value can be accessed in print captions, emails and QR codes using the {eventKiteGalleryId} token.
This field can be left empty if you are not using Event Kite and can be edited using the edit event dialog.
Next select the device it should run on and the orientation. The following devices are supported:
iPad 9.7"/iPad Mini - Creates 2048x1536 screens with a 4:3 aspect ratio which are suitable for older iPads and iPad Minis
iPad 10.2" - Creates 2160x1536 screens for the current range of standard iPads
iPad 10.5" - Creates 2224x1668 screens with a 4:3 aspect ratio which are suitable for 10.2" iPads such as the second generation iPad Pro
iPad Air 10.9" - Creates 2360x1640 screens for the current iPad Air
iPad Pro 11" - Creates 2388x1668 screens for the current iPad Pro 11" and the previous generation iPad Pro 11"
iPad Pro 12.9" - Creates 2732x2048 screens with a 4:3 aspect ratio for the higher resolution 12.9" iPads
iPhone X series - This creates 2436x1125 screens designed to fit X series iPhones which have an aspect ratio of approximately 2:1. Use this setting to get the best results from a X series iPhone, iPhone 11 or iPhone 12.
Other iPhone - This creates 1920x1080 screens with a 16:9 aspect ratio designed for other iPhones e.g. iPhone 8, iPhone 8 Plus, iPhone 7.
Breeze Booth for iPad will display resize screens to fit a particular iPad's display resolution if the screen size doesn't match. This means that you can use an event with screens created for an iPad Pro 12.9" on a iPad 10.5" without having to modify the screens. A thin black border will be displayed top and bottom or at the sides if the iPad's display aspect ratio doesn't match the screens e.g. a thin black border will be displayed when displaying screens designed for an iPad Pro 12.9" on an iPad Pro 11".
For best results please select the device type that best matches the iPads that will be used to run the event.
Click on "Next >" to go to the next screen:
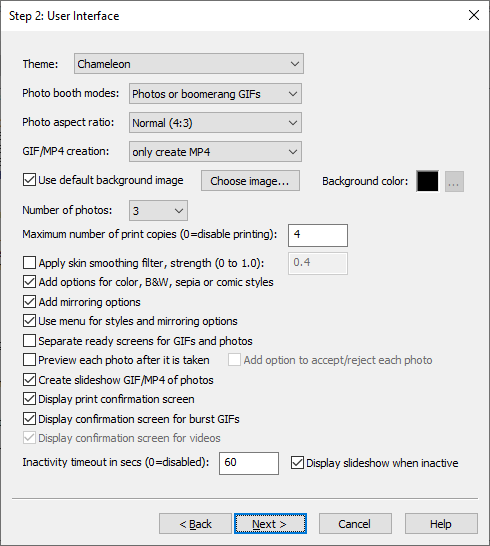
Select the theme to use from the "Theme" dropdown list. Currently only one theme is available, Chameleon. Additional themes may be added in future releases.
Select whether the have photos only, boomerang GIFs only, videos only or a choice of photos or boomerang GIFs using the "Photo booth mode" dropdown list.
Select the "Photo aspect ratio". The "Normal (4:3)" option will fill the screen on most iPads and uses the full resolution of the iPad's camera. The "Square (1:1)" option will crop the live view and photos to make them square. The "DSLR (3:2)" option will crop the photos to the same aspect ratio as a DSLR camera and is useful if you wish to use print layouts designed for a DSLR photo booth.
Use the "GIF/MP4 creation" dropdown list to choose whether to create GIFs only, MP4s only or both when creating boomerang GIFs or slideshow GIFs.
Select "Use default background image" to use a single default_background.jpg image as the background for each screen. You can use the default background provided by the theme or choose your own image by clicking on the "Choose image..." button.
Alternatively you can select a solid color for the default background image by unselecting "Use default background image" and then clicking on the "..." button to the right of the background color preview.
Use the "Number of photos" dropdown list to specify the number of photos to take when using the photo option.
Select "Apply skin smoothing filter" to apply skin smoothing to photos and burst GIFs. Please see General Settings for more information about skin smoothing.
The "Maximum number of print copies" setting controls the maximum number of copies the user can select in the print confirmation screen. Set this to 0 to disable printing when using Breeze Hub.
Select "Add options for color, B&W, sepia or comic" if you would like users to be able to select one of these options from the ready screen.
Select "Add mirroring options" if you would like users to be able to select one of these options from the ready screen.
Select "Use menus for styles and mirroring options" if you would like to display the options to users in a menu rather than as separate buttons on the ready screen.
Select "Separate ready screens for GIFs and photos" to create separate ready screens for photo mode and GIF mode. When this option is selected the photos ready screen will have a start button and a button to switch to GIF mode and the GIF ready screen will have a start button and a button to switch to photo mode. When this option is not selected a single ready screen will be displayed with a "start photos" and a "start GIF" button.
Select "Preview each photo after it is taken" to display a preview of each photo after it is taken. Give users the option to accept or reject (i.e. re-take that photo) each photo by selecting "Add option to accpet/reject each photo".
Select the "Create slideshow GIF/MP4 of photos" to create a slideshow GIF/MP4 of the photos taken in photo mode.
Select "Display print confirmation screen" giving users the option to accept or reject the photos before printing or sharing them. This will also allow users to select the number of copies to print.
Select "Display GIF confirmation screen" to display a playback screen showing the boomerang GIF giving guests the option to reject it before going to the sharing screen.
Select "Display video confirmation screen" to display a playback screen showing the video giving guests the option to reject it before going to the sharing screen.
Set the "Inactivity timeout in secs" to switch to the standby screen after a timeout when the booth is not in use. Select "Display slideshow when inactive" to display a slideshow of photos and GIFs from previous sessions when the booth is inactive.
Set "Inactivity timeout in secs" to 0 to disable the inactivity timeout (and the slideshow).
Click on "Next >" to go to the next screen:
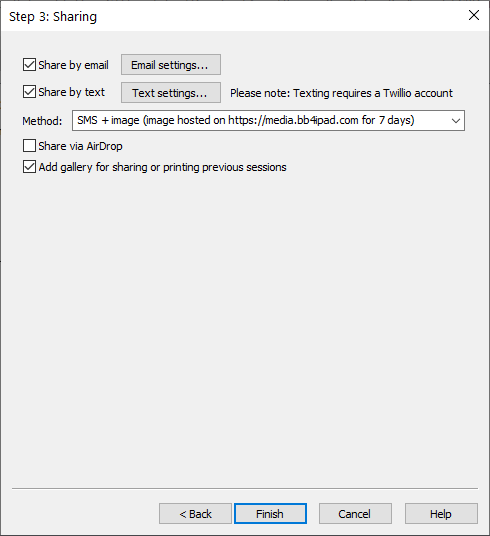
Select the "Share by email" to give guests the option to share photos, videos and GIFs by email. The event creator will use the simple email settings to generate an email with an optional logo, an image preview, message text and optional links to social media sites. Click on the "Email settings..." button to adjust the email settings. If you need full control over the appearance of emails you can edit the event and select the advanced sharing settings. Please see the Sharing Settings section for more information.
Select "Share by text" to give guests the option to share photos, videos and GIFs by text. Click on the "Text settings...." button to edit the text message. The select the method to specify how the photos and GIFs are shared. The default option is to host the photo or GIF on our media sharing website for 7 days and include a link to it in the SMS message sent to guests. Users in the USA or Canada can also send the photos or GIFs as MMS messages.
Please note that the sending of text messages (SMS or MMS) requires a Twillio account. Twillio charge for each text sent (the cost of sending texts is not included in your Breeze Booth for iPad subscription). Please visit Twilio's website for more information.
Select "Share via AirDrop" to give guests the option to share photos, videos and GIFs by AirDrop.
Select "Add gallery for sharing and printing previous session" to add a gallery of photos, videos and GIFs from previous sessions with the option for guests to reprint photos or share photos, videos and GIFs via email, text or AirDrop.
Please see the Gallery and Slideshow Settings section for more information.
Click on the "Finish" button to create the event using the selected theme and settings. This will create all the settings and screens needed for the event. Click on the "Save" button in the main "Breeze Booth Event Editor" window to save the newly created event to the list of events.
Customizing Events and Themes
After creating an event using the event creator it can be modified by editing the screens using an image editor such as Photoshop or editing the settings using the event editor (double click on the event or select the event and then click on "Edit event...".
Creating new theme designs is beyond the scope of this help file, but there are some simple changes that can be made e.g. changing the screen background image, the keyboard designs or the appearance of the icons.
Changing the screen background
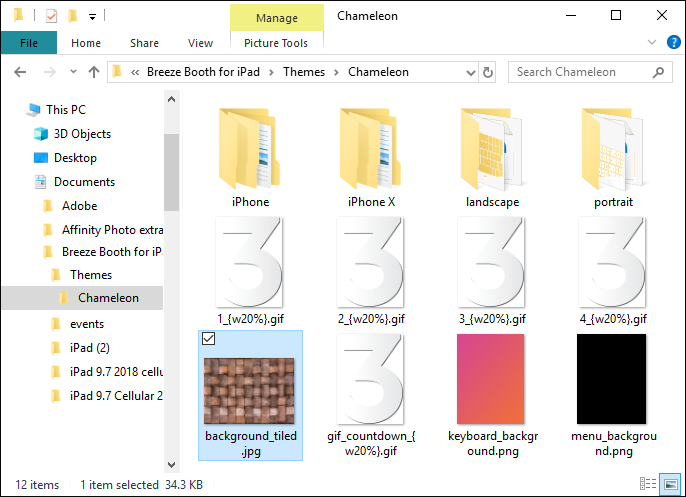
The screens can have a colored background or a background JPEG image. The Chameleon theme uses a background JPEG image to create a magenta/orange graduated background. The Chameleon theme folder can be found in your Documents folder in the subfolder Breeze Booth for iPad\Themes. The JPEG image used for this theme is named background.jpg. Edit or replace the background.jpg image to use a different background when creating events.
The naming of the background image defines how it is applied:
background_stretched.jpg - stretches the background image to fill the screen
background_tiled.jpg - tiles the background to fill the screen
background_cropped.jpg - uses the background without resizing and crops it to fit if it is larger than the screen
background.jpg - is the same as background_stretched.jpg
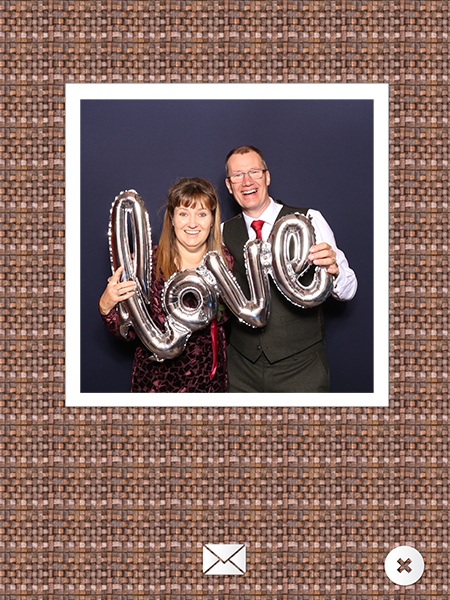
Example: to create a background with a weave pattern find a suitable image for tiling and copy it to the Chameleon theme's folder and name it background_tiled.jpg:
Which will create screens like this:
Changing the keyboard background
Keyboards are defined using png images to define their appearance when upper or lower case is slected or the keys are pressed (see Keyboards and Surveys for more info). If the keyboard images have transparent backgrounds (as is the case with the Cameleon theme) you can provide a background image for the keyboards. Keyboards appear on top of other screens and can have transparent, semi-transparent or opaque backgrounds to control whether the screen beneath is visible. For this reason the the background images are PNG files which can contain an alpha channel to control transparency.
The Chameleon theme folder can be found in your Documents folder in the subfolder Breeze Booth for iPad\Themes. The PNG image used for this theme is named keyboard_background.png. Edit or replace the keyboard_background.png image to use a different background for keyboards when creating events.
The naming of the background image defines how it is applied:
keyboard_background_stretched.png - stretches the background image to fill the screen
keyboard_background_tiled.pmg - tiles the background to fill the screen
keyboard_background_cropped.png - uses the background without resizing and crops it to fit if it is larger than the screen
keyboard_background.png - is the same as keyboard_background_stretched.png
Changing the icons
The icons used for the buttons in each screen are defined by PNG images that have filenames that define their purpose and their size and position e.g. photo_start_{lx50%bx16%W20%}.png is used for the start button in photo booth mode. The last part of the filename enclosed in curly brackets is used to define its size and position. e.g. W20% means it should be resized to 20% the width of the screen. Edit the PNG file in an image editor such as Photoshop to change its appearance.